Quick summary
WooCommerce HPOS (High-Performance Order Storage) stores orders in dedicated database tables. To migrate safely, test plugin compatibility on an isolated copy of your store, complete synchronization-the copying of order data between the two storage systems-then compare order fields after switching storage.
- Test payments, refunds and custom fields; do not rely only on compatibility declarations.
- Do not make HPOS the primary source while synchronization is pending.
- Check totals, statuses and customer details alongside order counts.
- Plan rollback around preserving current orders, not just restoring an old backup.
If your store keeps accepting orders, you may wonder where new orders will go and whether existing ones will remain visible. Until you switch, WooCommerce continues using the currently selected storage. Once synchronization finishes and you select HPOS as the primary source, WooCommerce reads and updates orders in the new tables, keeping existing order IDs. Your order-related plugins and custom code must support HPOS.
You will first check order workflows on an isolated test copy. On the live store, you will temporarily restrict order changes, finish synchronization and record order details before switching, then compare those details afterward. If problems arise, you will identify which storage contains the latest data before rolling back, meaning returning to the previous storage. This helps you avoid losing newer orders or payment updates by restoring an older backup.
What HPOS changes and what to prepare before migration
A WooCommerce HPOS migration copies your existing orders to dedicated database tables, then changes which storage WooCommerce uses to read and update them. HPOS (High-Performance Order Storage) separates order data from WordPress’s general content tables. Before switching, check which storage your store currently uses and whether the plugins that access orders support HPOS.
In the legacy structure, the main order records are stored in wp_posts and wp_postmeta. HPOS uses wp_wc_orders and related dedicated order tables instead. Keeping order queries separate from general content queries can improve performance, but it will not solve every slowdown in your store.
The authoritative data source is the storage WooCommerce relies on when reading and updating orders. The other storage may also contain order records, but those records are not necessarily current. Do not decide to switch simply because both sets of tables contain data.
Example scenario
You will follow a hypothetical single-site store, magaza.example, whose table prefix is wp_. The prefix is the shared beginning of its database table names. WordPress tables are initially authoritative; HPOS is off. You will restore a full backup to an independent staging copy-a separate site for testing-at test.magaza.example. This example assumes a WooCommerce version that supports HPOS and a payment plugin with a test mode. You will still check compatibility for the installed versions.
In your live admin dashboard, open WooCommerce > Settings > Advanced > Features. Record the selection under Order data storage; do not change it yet. In this example, WordPress posts storage should be selected. This confirms that WooCommerce currently reads and updates orders in the legacy storage.
In the same section, Enable compatibility mode synchronizes order data from the authoritative storage to the other storage. Synchronization keeps the second copy updated for migration or rollback, but you must let pending updates finish before switching. Compatibility mode does not automatically make a plugin that lacks HPOS support compatible. Labels and available controls may vary by WooCommerce version.
Inventory your plugins and establish a recovery baseline
Open Plugins > Installed Plugins and list your plugin names and installed versions. Highlight payment, invoicing, shipping, subscription, accounting and order export tools: their order operations must work correctly after the switch. Also record your WooCommerce, WordPress and PHP versions from WooCommerce > Status. Check compatibility for the versions you use, not just the product names.
Add custom theme code, must-use plugins-plugins WordPress loads automatically-and external integrations that query order tables directly. For each entry, record the developer’s HPOS compatibility statement for the installed version and the operation you will test. For the payment plugin, record order creation and refunds; for the invoicing plugin, record invoice generation and custom order number retrieval. If a component has no compatibility statement, ask its developer to clarify support before testing.
To prepare your staging copy, open the backup creation screen in your hosting panel or backup tool. Include all site files and the entire database, using the options provided by your tool. An order export alone cannot restore the store with its settings and plugins. When the backup finishes, check that the file archive, database copy and successful completion record are available. Store the backup separately from the live server with access restricted to authorized people, because it contains customer information.
Recovery means restoring the files and database from the same backup together. In the next stage, you will restore this backup to an independent staging copy to check that it is usable. Keep order archiving, database cleanup and bulk updates separate from migration preparation so you can identify the effects of each change. If your live store continues taking orders, this first backup will not contain subsequent transactions. You will create a fresh recovery point before switching the live store.
Verify plugins and order workflows on a staging copy
Restore the backup to an isolated staging copy
For this example scenario, use your hosting panel’s domain section to create a separate site directory for test.magaza.example. Set this directory as the staging domain’s document root-the folder from which the site is served. Enable HTTPS and password protection for the staging site. In the panel’s database section, create a database named magaza_test and a dedicated user with access only to that database. Do not reuse the live database user: separate access helps keep staging changes out of the live database.
Before running the copy, restrict its outbound connections in the firewall so it cannot contact live payment, shipping, accounting or email services. These network rules must apply to staging independently of the live site. If your panel does not provide that separation, ask your server administrator to establish it before starting the copy. The backup may contain pending automated tasks; password protection blocks visitors, but does not stop those tasks from contacting external services.
In the panel’s file manager, extract the full file backup into the staging directory. Then use your database management tool’s Import section to load the SQL database backup into magaza_test. After the import finishes, you should see the copied WordPress tables in that database. In the staging copy’s wp-config.php file, replace the database name, username and password with the staging database details. Update the database server address too if it differs. Keep the wp_ prefix; it must match the imported tables. If you use a persistent object cache, which retains cached data between requests, give staging a separate cache space or disable its cache connection before loading the copy.
The address replacement below requires WP-CLI, the WordPress command-line tool, and SSH access, a secure way to connect to your server. If either is unavailable, ask your administrator to help complete this step. Connect through SSH and work from the staging site’s directory. Before running either command, confirm that the configuration file points to the staging database, not the live database.
The first command previews the replacements without changing data. Review its output to confirm that it targets the copied site’s tables, then run the second command to replace the live address with the staging address. WP-CLI handles serialized fields-structured data stored as text-without breaking their format. The second command should report the completed replacements. Keep the original backup so you can rebuild only the staging copy if a change goes wrong.
wp search-replace 'https://magaza.example' 'https://test.magaza.example' --all-tables-with-prefix --skip-columns=guid --dry-run
wp search-replace 'https://magaza.example' 'https://test.magaza.example' --all-tables-with-prefix --skip-columns=guid
Sign in to the staging admin dashboard and check that the browser address stays on the staging domain. Under WooCommerce > Settings > Emails, open each enabled notification, clear its enable checkbox and save. Also remove live credentials from plugins that send email through SMTP, an email delivery protocol, or an API connection to an email service. Disabling WooCommerce notifications alone does not stop other plugins from sending messages; keep the outbound email block in place.
Under WooCommerce > Settings > Advanced > Webhooks, open each webhook, set its Status to Disabled and save. Webhooks send event notifications to external services. Confirm that the entries now show as disabled. Next, open WooCommerce > Settings > Payments, choose your payment plugin’s settings, enable Test mode, enter the provider’s test keys and save. Reopen the settings to confirm that test mode is selected.
Allow outbound network access only to the payment test services you need, leaving live integrations blocked. If the provider uses the same address for test and live transactions, a network rule alone cannot distinguish them. Confirm that both test mode and test credentials are in place before attempting a staging payment.
Test compatibility and the HPOS order workflow
On your staging copy at test.magaza.example, check incompatibility notices under Plugins > Installed Plugins and read the developers’ HPOS compatibility statements for your installed versions. An absence of notices is not proof of compatibility. Have your developer review custom code for order-related queries against wp_posts and wp_postmeta, and uses of get_post_meta(). Where necessary, replace direct access to order data with wc_get_order() and the order object’s methods for reading, updating and saving data. These methods let WooCommerce handle the selected storage rather than assuming orders are in the legacy tables.
Under WooCommerce > Orders, select samples of older, recent and refunded orders, plus orders with custom fields, and record their existing IDs. Note their statuses, totals, taxes, products, addresses, refunds and custom fields. You will use these notes to compare the same orders after switching storage.
Open WooCommerce > Settings > Advanced > Features on staging. Under Order data storage, leave WordPress posts storage selected, turn on Enable compatibility mode and click Save changes. This synchronizes orders to HPOS while WooCommerce continues to use WordPress storage. Watch the synchronization notice in the same section; use Sync now if that link appears in your version. Refresh the page until no synchronization remains pending. If the pending count is not decreasing, leave the storage selection unchanged and follow the troubleshooting section below to investigate background tasks.
Once synchronization finishes, select High-performance order storage and click Save changes, leaving compatibility mode enabled. Reopen the page: HPOS should remain selected. Then return to WooCommerce > Orders, open the same order IDs and compare their fields with your earlier notes. This checks that existing orders can be read correctly from the new storage, not just that the setting was saved.
Place an order through the staging checkout using the test payment method configured earlier. Open the new order under WooCommerce > Orders and check its status and payment transaction record. Check the purchased product’s stock quantity too; for a stock-managed product, the reduction should match the quantity purchased once the payment workflow triggers stock reduction. The transaction should also appear in the provider’s test dashboard.
Try a test refund and confirm its record in both the order and the provider’s test dashboard. Test invoicing and shipping operations only in the relevant provider’s test environment. Record any integration that fails or cannot be tested as an issue to resolve before the live migration. Do not move orders from this copy to production. If the copy becomes unusable, restore the original backup only to staging.
Complete synchronization and switch the live store to HPOS
Restrict order writes and take a fresh backup
Once staging checks pass, begin your planned migration window on magaza.example. In your maintenance tool’s access settings, block visitors’ cart and checkout access while keeping administrator access open. Use another browser without an administrator session to confirm that a visitor cannot place a new order. A maintenance notice alone does not stop incoming orders.
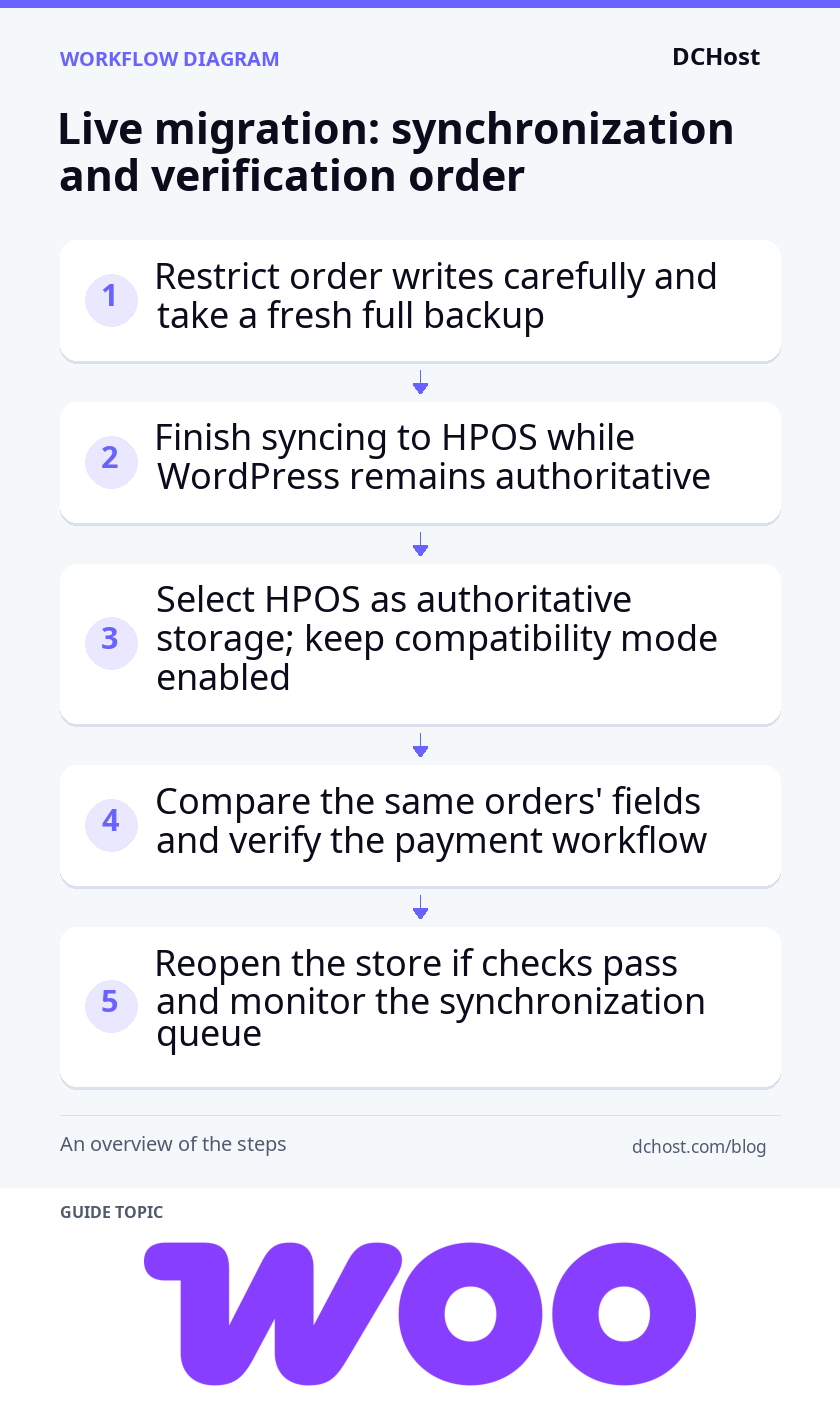
Ask your store team to pause order editing so that records stay unchanged during comparison. In your accounting and marketplace integrations’ scheduling screens, pause order imports. Pause subscription renewals in the tool that manages them too. Keep a list of everything you pause so you can resume it after the checks.
Allow payment notifications for transactions already in progress to arrive. Do not block server-to-server notifications from your payment provider: WooCommerce may need these to record a completed payment against an order. If a notification changes an order, repeat the final synchronization check before switching storage. Keep WordPress scheduled tasks running, because synchronization also uses background tasks.
Once order creation and updates have settled, open your hosting panel’s backup screen, select all site files and the entire database, and start a fresh backup. Check the successful completion record and confirm that the backup files are available. This is your pre-migration recovery point, but it cannot contain orders or changes made afterward. If a problem occurs after the switch, preserve the current data before considering a restore from this older backup.
In the live admin dashboard, open WooCommerce > Settings > Advanced > Features. Under Order data storage, leave WordPress posts storage selected. Select the Enable compatibility mode checkbox and click Save changes. This synchronizes orders to HPOS while WordPress remains authoritative-the storage WooCommerce uses to read and update orders.
Watch the pending synchronization notice in the same section; use Sync now if that link appears in your version. Refresh the page until it shows that no orders remain pending synchronization. If the pending count stops decreasing, leave the storage selection unchanged and troubleshoot the Action Scheduler queue, which holds the background tasks used for synchronization. Resolve the cause before proceeding.
Select HPOS and verify orders and checkout
Under WooCommerce > Orders, choose samples of older, recent and refunded orders, plus orders with custom fields, from the live store. Record their IDs and the current values of the fields listed below. These notes give you a before-and-after comparison of the same records. Then return to the Features screen, select High-performance order storage and click Save changes, leaving compatibility mode enabled. Reopen the page: HPOS should remain selected, meaning WooCommerce now uses it to read and update orders.
On the Orders screen, open those same order IDs. Compare their statuses, products, quantities, totals, taxes, shipping costs, addresses, refunds, payment transaction IDs and custom fields with your pre-migration notes. The values should match; matching order counts alone cannot show that these details are correct.
If the records match, use your maintenance tool to grant store access only to the person checking the payment workflow. Make a controlled real purchase permitted by your payment provider, keeping the live payment settings unchanged rather than putting the whole store into test mode. This purchase creates a real charge and notifications, so account for any automatic invoicing or shipping operations before placing it.
Open the new order under WooCommerce > Orders and compare its payment record with the transaction in your provider’s dashboard. Confirm that only one order was created, its status reflects the payment result, and stock changed as expected. If a refund is needed, use your normal refund process rather than deleting the order, so the charge and refund remain traceable.
If any order fields or payment checks fail, keep the store restricted and investigate before reopening. Do not switch back to legacy storage unless you have confirmed that it contains the latest orders and changes. If all checks pass, remove the maintenance restriction and resume the paused integrations and tasks one at a time, following your list. Monitor the first new orders and the pending synchronization notice as normal activity resumes.
If synchronization stalls or orders look different
First, isolate the source of the problem
Stalled synchronization does not, by itself, mean orders have been lost. In the live admin dashboard, open WooCommerce > Settings > Advanced > Features. Under Order data storage, record the selected authoritative storage-the source WooCommerce relies on-and any pending synchronization count or notice. Leave this selection unchanged while you investigate so you can keep track of which storage holds the current records.
Under WooCommerce > Status > Scheduled Actions, inspect pending and failed tasks. Open the details of a task related to HPOS synchronization and note its execution time and any error message in its log. If pending tasks are overdue and never start, check how scheduled tasks are triggered. If tasks start but fail, use the error message to identify the plugin or database issue to investigate next.
Under WooCommerce > Status > Logs, look for error entries from the same time. If an order looks different only in an accounting or reporting screen, open the same order ID under WooCommerce > Orders. If the main order is correct but the integration’s output is wrong, first investigate whether the integration reads legacy tables directly or uses outdated cached data. A discrepancy in one output does not mean the entire order store is corrupted.
Apply a targeted fix for the identified cause
If tasks are not starting and your hosting panel runs WordPress scheduled tasks, open the panel’s scheduled tasks section. Check that the relevant entry is enabled, points to the correct site and has no error in its latest execution log. If that entry is the cause, correct it without changing unrelated tasks. The absence of a panel entry is not necessarily an error: your site may use the WordPress scheduler triggered by visits.
If the log identifies an error in a particular plugin, try the fix on test.magaza.example first. Repeat the same order operation and check that the error no longer occurs. Then take a fresh full backup and apply the fix to the live store. Keep the previous version of the plugin or code so you can undo the change if needed, rather than restore order data from an older backup. If a plugin update also changes the database, check its rollback instructions before applying it; replacing its files alone may not undo those changes. Do not delete the queue in bulk or rerun payment tasks indiscriminately.
After applying the fix, use Sync now on the Features screen if that link is available. Refresh the page to check whether the pending count decreases. Return to the scheduled task logs to check for new errors, then compare the affected orders’ fields with your pre-switch records. Synchronization should finish without new errors, and the fields should match. A pending count of zero alone does not show that custom fields were transferred correctly.
Update the legacy storage before switching back
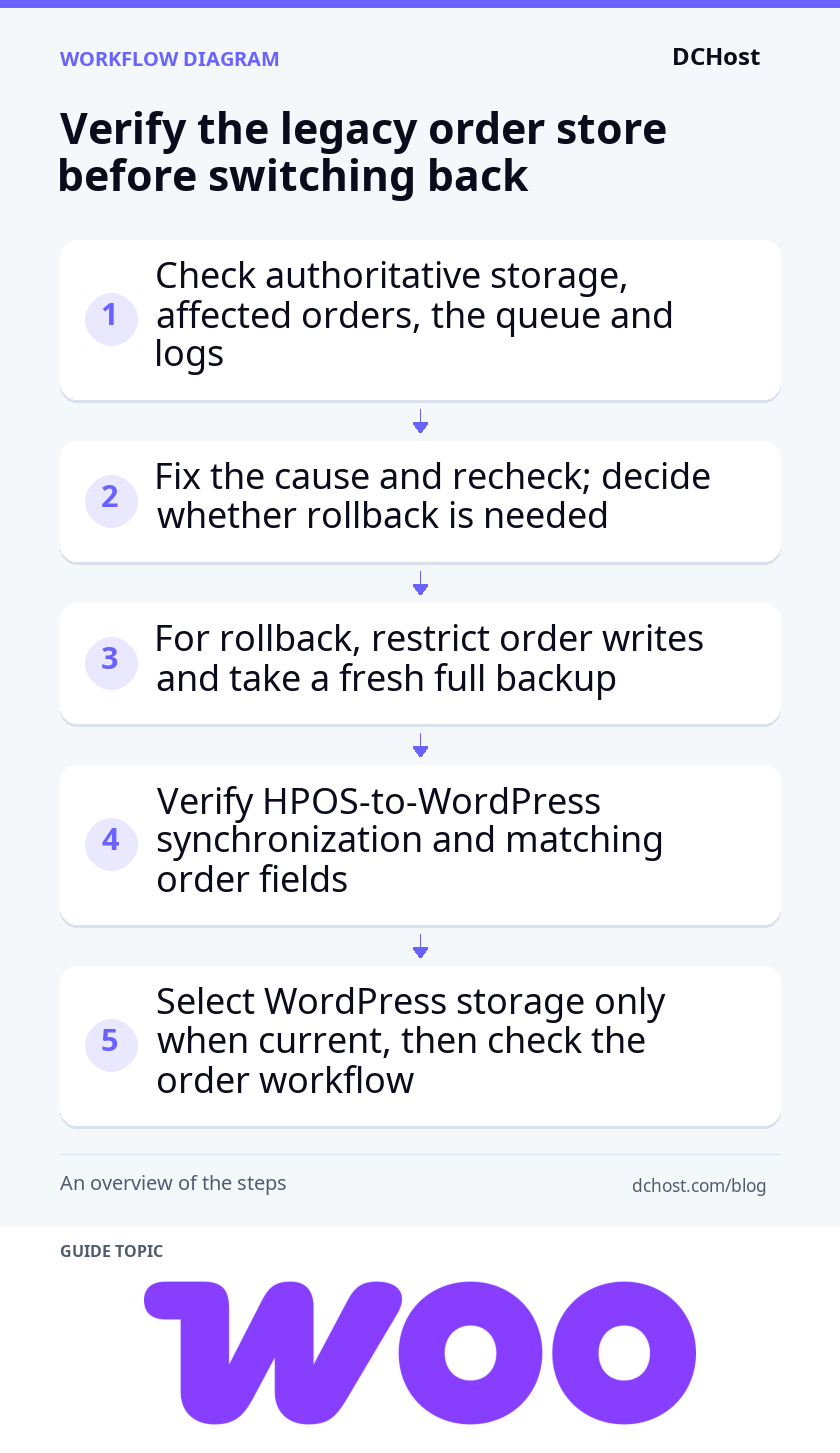
Before switching back from HPOS, make sure the WordPress order store contains the latest orders and updates. Use the earlier maintenance arrangements to pause operations that write order data, while still allowing payment notifications, and take a fresh full backup. Open WooCommerce > Settings > Advanced > Features. Keep HPOS selected as the authoritative storage-the source WooCommerce reads and updates-and ensure Enable compatibility mode is checked, then click Save changes. Synchronization runs from HPOS to the WordPress order store, copying new records and changes made in HPOS.
Refresh the Features screen until no synchronization remains pending. If another payment notification updates an order, repeat this check. Then, with your developer, compare the statuses, amounts, refunds and custom fields for the same order IDs in both stores, focusing on orders created or changed after migration. The current Orders screen shows the authoritative data; it cannot confirm that the other store is current. Have your developer compare both stores without editing their records. If the fields match, select WordPress posts storage on the Features screen and save. If synchronization cannot finish or differences remain, do not force the switch.
Reopen the Features screen to confirm that WordPress storage is selected, then open the same order IDs under WooCommerce > Orders. Compare their fields with your notes and repeat the controlled payment workflow check before reopening the store and resuming paused tasks. This confirms that the legacy storage is usable, rather than relying only on the synchronization counter.
Restoring the pre-migration backup instead can remove subsequent orders, refunds and payment updates from your database; it does not reverse charges with your payment provider. If a backup restore is necessary, first preserve the current files and database in a separate full backup. Before restoring, reconcile orders, charges and refunds since the backup time against the provider’s records. Agree with your developer on how to transfer those later records and updates into the restored store without charging customers again.
Frequently Asked Questions
Does HPOS move products and stock to new tables too?
No. HPOS changes order storage; it does not move products, variations or their stock quantities into the new order tables. Product records in the example environment continue to use wp_posts and wp_postmeta. WooCommerce’s supporting product tables also remain separate. Enabling HPOS therefore does not automatically resolve slow product catalog queries.
Stock reduction and restocking during refunds still depend on the order workflow. If you use an inventory integration, check its HPOS support. On staging, place a test order for a product with stock management enabled and check that its stock decreases. Then issue a test refund with the restocking option selected and check that the refunded quantity is added back.
Will existing order numbers change?
An HPOS migration does not change existing order IDs. However, the order number your customer sees may be a custom number generated by a plugin. If you use sequential or prefixed numbering, check that your installed version of the numbering plugin supports HPOS.
Opening an order with the same ID in the admin dashboard does not prove that its custom number is correct on invoices or in emails. On your staging copy, compare existing orders’ numbers in those outputs with your pre-migration records. Inspect email output without enabling delivery to real customers. Place a new test order too, and check that numbering continues in the expected sequence and format.
Is HPOS enabled for all stores at once in Multisite?
No. WordPress Multisite lets you run multiple sites within one WordPress installation. You select HPOS separately in each site’s WooCommerce settings. Each site also has its own order tables and synchronization status.
A network-activated plugin, enabled across the installation, can affect every store. A successful check on one store does not show that the others work correctly. Unlike the single-site example, list payment methods and integrations separately for each store in your network. Base each store’s migration decision on its own synchronization and order checks.
Can I keep using older order archiving tools?
Only after confirming that your installed version supports HPOS and your chosen storage configuration. A tool that searches for older orders directly in wp_posts may miss HPOS records or change only the synchronized copies. Look beyond a compatibility label: check the tool’s documentation for how archiving, deletion and restoration work with HPOS.
An order export alone does not guarantee that you can restore those orders. Keep your order archiving and database cleanup plan separate from the migration. Before testing the tool, take a full backup of the isolated staging copy. Archive sample orders, then retrieve them using the tool’s restore function. Check that their IDs, amounts and custom fields are preserved. If the operation damages the data, restore that backup only to the staging copy.
Final checklist for completing the migration
Before marking the migration as complete, check off each item below. Seeing HPOS selected is not enough; your order data and the operations that use it must also work correctly.
- Compatibility: You have tested the order operations performed by active plugins, custom code and external integrations with HPOS enabled.
- Synchronization: No orders remain pending synchronization, and the related scheduled tasks show no new errors.
- Consistency: For your sample of older, recent and refunded orders, including orders with custom fields, the IDs, statuses, amounts and custom fields match your pre-migration notes.
- Payments: Payment records match the provider’s dashboard and agree with order statuses. You have also checked stock movements, notifications and the refund workflow.
- Rollback: You can access a current full backup. Your rollback plan includes completing synchronization from HPOS to WordPress storage and comparing order fields before selecting WordPress storage again.
Next, decide who will monitor new orders and synchronization errors, and when they will check them. Schedule database cleanup and order archiving separately from this migration; test those operations on the staging copy before applying them to your live store.