Quick summary
A Kubernetes persistent volume claim (PVC) stuck Pending means your application’s persistent storage request has not yet been matched with a storage resource. Possible causes include an incorrect storage class, missing disk-creation permissions, capacity limits or a wait for node selection. It does not necessarily indicate a disk attachment failure.
- Start with the claim’s Events section to find out why it is waiting.
- StorageClass defines the storage driver and settings used to provide storage.
- WaitForFirstConsumer can delay provisioning-the creation or allocation of storage-until Kubernetes determines placement for the Pod, the unit running your application’s containers.
- Binding the claim to storage and attaching that storage to the node running your application are separate stages.
If your application is deployed but its Pod will not start and its storage request remains Pending, check events first. These messages help you distinguish storage-class, provisioning and node-selection problems so you can target the cause rather than change settings at random.
Example scenario: On a hypothetical existing Amazon EKS cluster, AWS’s managed Kubernetes environment, you’ll diagnose a claim with an incorrect storage-class name. You’ll confirm that it has no associated PV, disk or data before recreating it with the correct class, then check that the consumer Pod can write and read a file-not just that its status changes.
Diagnose PVC Pending through events
A Kubernetes PVC stuck Pending means that your application’s persistent storage request has not yet been matched with a storage resource. A PVC (PersistentVolumeClaim) describes the storage you need, including capacity and access mode-how nodes may access it. A PV (PersistentVolume) represents the disk or other storage resource available to meet that request. When a PVC is Bound, it has been matched with a PV; that alone does not prove the application can use the disk.
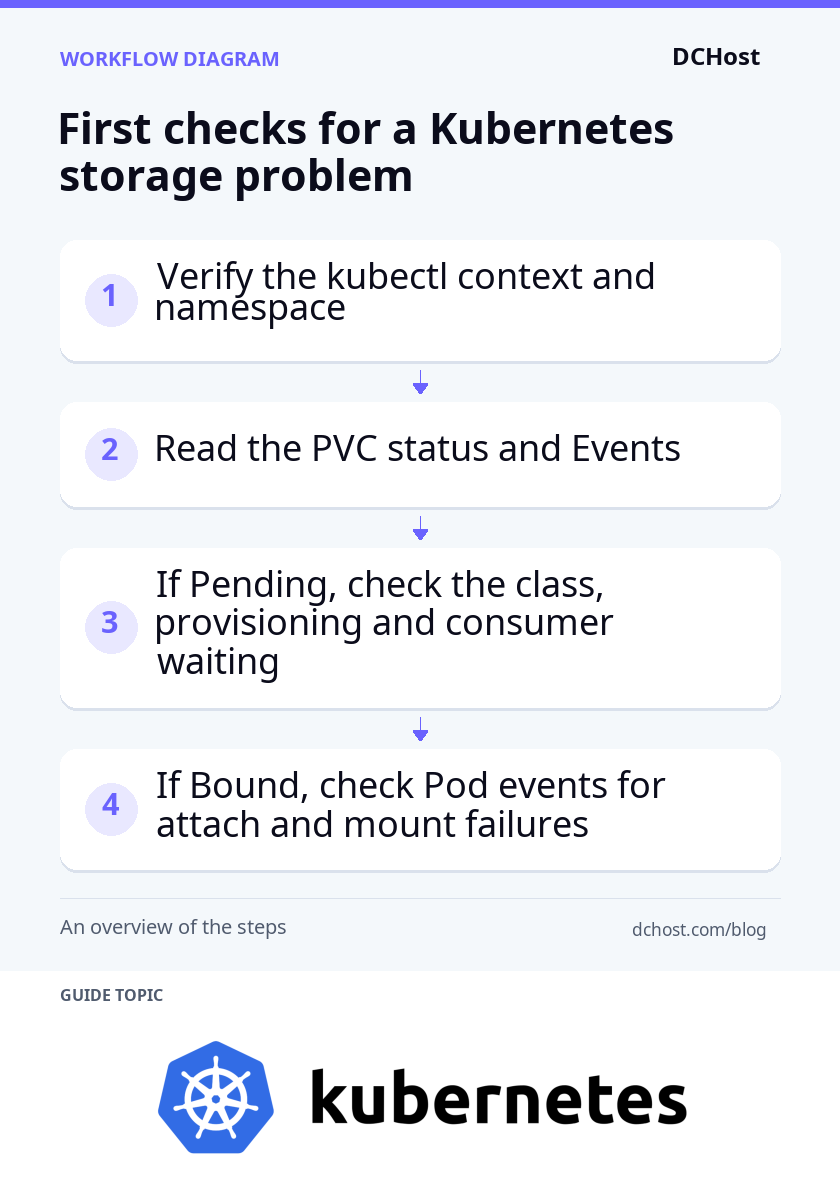
A Pod is the unit that runs your application containers. If it will not start, first check whether its storage claim is still waiting or has already bound to a volume that the Pod cannot use. These are different stages, and identifying the failing stage helps you avoid changing the wrong resource.
Check the cluster and namespace first
Example scenario: This hypothetical environment uses an existing Amazon EKS cluster with Linux worker nodes. EKS is AWS’s managed Kubernetes service; cluster setup is outside this walkthrough. Run the following commands in your administrator terminal with kubectl access to the cluster. The context determines which cluster and user identity your commands use; the namespace is the logical area containing your resources.
kubectl config current-context
kubectl config view --minify
kubectl get namespace pvc-demo
kubectl get pvc -n pvc-demo
Check that the cluster and user details in the first two outputs belong to your intended EKS environment. The last two commands should show the namespace and its claims. The example claim is app-data in the pvc-demo namespace. When investigating your own issue, substitute your existing resource names. If you see NotFound or an empty list, check the namespace and confirm that the resource exists before investigating storage. Forbidden means the identity running the command lacks permission for that operation.
Use PVC events to identify the failing stage
Once you have found the correct claim, read its details and events. Events record what Kubernetes has attempted and why an operation is waiting or failing. The first command shows the claim’s current state; the second lists its events by creation time. Neither command changes resources:
kubectl describe pvc app-data -n pvc-demo
kubectl get events -n pvc-demo --field-selector involvedObject.kind=PersistentVolumeClaim,involvedObject.name=app-data --sort-by=.metadata.creationTimestamp
In the describe output, Status shows the claim’s state, StorageClass identifies its storage class, and Volume shows the bound PV’s name. A storage class specifies the driver and settings used to provision, or create, the disk. In the Events section, read each event’s reason together with its message:
storageclass.storage.k8s.io "gp3-typo" not found: The storage class named in the claim does not exist. Check whether the claim’s class name matches a class defined in the cluster.WaitForFirstConsumer: Disk provisioning may be waiting until Kubernetes determines which node will run the Pod that uses the claim. This consumer Pod must exist and be eligible for placement on a node. Waiting at this stage is not necessarily a fault.ProvisioningFailed: Disk creation or allocation failed. The permission, capacity or driver details in the message determine which setting or component to investigate next.
Events are kept for a limited time, so an empty Events list does not rule out a problem. If the PVC is Bound but the application will not start, binding has already succeeded. Look for the next clue in the Pod’s events:
kubectl describe pod disk-check -n pvc-demoThis command inspects the example’s consumer Pod-the Pod that uses the claim. In your environment, substitute the name of the Pod that uses your claim. If the Pod has not been created yet, a response saying it cannot be found is not a disk attachment error.
If the Pod exists, FailedAttachVolume points to a problem attaching the disk to the node, while FailedMount points to a problem making the storage accessible to the Pod. Read the rest of the event message to identify the affected volume and the reason the operation failed. These are different from an unbound storage claim. Follow the cause reported in the Pod event rather than deleting the bound claim.
Verify the example environment and fix the StorageClass error
If the event reports gp3-typo not found, the claim names a storage class that does not exist. Before creating the correct class, check that its storage driver is ready. This hypothetical example uses standard Amazon EKS with Linux EC2 worker nodes; the same settings do not apply to EKS Auto Mode or Fargate-only clusters.
Check EKS, the driver and permissions
Run these commands in your administrator terminal with kubectl and the AWS CLI, AWS’s command-line tool, installed and authenticated. Your AWS identity needs permission to read the target cluster and its add-ons. Replace the example cluster name and region with your values. The commands show your AWS identity and let you compare the cluster endpoint-its API address-with the address used by kubectl:
export CLUSTER=my-eks
export AWS_REGION=eu-central-1
aws sts get-caller-identity
aws eks describe-cluster --name "$CLUSTER" --region "$AWS_REGION" --query 'cluster.{Status:status,Endpoint:endpoint}'
kubectl config view --minify -o jsonpath='{.clusters[0].cluster.server}'
kubectl get nodes -L kubernetes.io/os,topology.kubernetes.io/zone
kubectl auth can-i create storageclasses.storage.k8s.io
kubectl auth can-i create persistentvolumeclaims -n pvc-demo
kubectl auth can-i delete persistentvolumeclaims -n pvc-demo
kubectl auth can-i list persistentvolumes
Confirm that the identity output shows the intended AWS account. The cluster status should be ACTIVE, the API endpoints in both outputs should match, and suitable Linux nodes should be Ready. The permission checks should return yes. Together, these checks help confirm that you are working in the intended cluster and have permission for the listed operations. If a permission is missing, ask your cluster administrator for access to that specific resource and operation rather than broad administrator access.
CSI, the Container Storage Interface, connects Kubernetes to storage drivers. This example assumes that the AWS EBS CSI add-on and the IAM role needed to create disks already exist. EBS provides the AWS block storage disks used here; IAM controls access to AWS resources. Use the following commands to inspect the add-on’s status, its role association and the driver components in Kubernetes. Your AWS identity also needs permission to list Pod Identity associations:
aws eks describe-addon --cluster-name "$CLUSTER" --addon-name aws-ebs-csi-driver --region "$AWS_REGION" --query 'addon.{Status:status,Role:serviceAccountRoleArn,PodIdentity:podIdentityAssociations,Health:health.issues}'
aws eks list-pod-identity-associations --cluster-name "$CLUSTER" --namespace kube-system --service-account ebs-csi-controller-sa --region "$AWS_REGION"
kubectl get csidriver ebs.csi.aws.com
kubectl -n kube-system get deployment ebs-csi-controller
kubectl -n kube-system get daemonset ebs-csi-node
kubectl get csinode -o yaml
The add-on should be ACTIVE. For the controller Deployment, the ready replica count should match the desired count; for the node DaemonSet, the ready count should match the desired number of nodes. In each target node’s CSINode record, an ebs.csi.aws.com entry shows that the driver has registered on that node.
The driver can receive its IAM role through a service-account role or a Pod Identity association. Pod Identity assigns AWS roles to Pods; you do not need both methods configured at once. A role association alone does not prove that the driver can create disks; the provisioning attempt will check those permissions in practice. If the add-on is missing or not ready, resolve that prerequisite before continuing. Creating a storage class does not install the driver.
Create the example StorageClass
A StorageClass specifies the driver and settings used to create a disk. First check for an existing definition with kubectl get storageclass gp3-demo -o yaml. If the class is not found, create and apply the file below in your terminal. If it already exists, compare its fields with the example rather than overwriting different settings. Continue only when the class matches the intended settings. If you skip creation, make sure your working directory still contains a pvc-demo folder for the files saved later.
mkdir -p ./pvc-demo
cat > ./pvc-demo/storageclass.yaml <<'EOF'
apiVersion: storage.k8s.io/v1
kind: StorageClass
metadata:
  name: gp3-demo
provisioner: ebs.csi.aws.com
parameters:
  type: gp3
volumeBindingMode: WaitForFirstConsumer
reclaimPolicy: Retain
EOF
kubectl apply -f ./pvc-demo/storageclass.yaml
kubectl get storageclass gp3-demo -o yaml
The file names the class gp3-demo, selects the standard EBS CSI driver and requests the gp3 disk type. The driver and settings in the final output should match the file. Creating this class alone does not create a disk.
WaitForFirstConsumer delays disk creation until Kubernetes determines placement for the Pod that will use it. Retain prevents automatic disk deletion when the claim is deleted. This preserves the disk, but cloud charges may apply once it is created, and manual cleanup is required when you finish using it.
Recreate only a verified empty, unbound claim
You cannot directly change the incorrect class name on the existing PVC in this example. To correct it, you must recreate the claim. First, run these commands in your administrator terminal to save its current definition and check for an associated PV or disk. The AWS command also requires permission to list EBS volumes:
kubectl get pvc app-data -n pvc-demo -o yaml > ./pvc-demo/pvc-before.yaml
kubectl get pvc app-data -n pvc-demo -o jsonpath='{.status.phase}{"\n"}{.spec.volumeName}{"\n"}{.metadata.uid}{"\n"}'
kubectl get pv -o custom-columns='NAME:.metadata.name,NS:.spec.claimRef.namespace,CLAIM:.spec.claimRef.name,UID:.spec.claimRef.uid,DISK:.spec.csi.volumeHandle'
kubectl describe pvc app-data -n pvc-demo
PVC_UID=$(kubectl get pvc app-data -n pvc-demo -o jsonpath='{.metadata.uid}')
aws ec2 describe-volumes --region "$AWS_REGION" --filters "Name=tag:CSIVolumeName,Values=pvc-$PVC_UID" --query 'Volumes[].VolumeId'
Before proceeding, the status must be Pending and volumeName must be empty. Compare the claim’s unique identifier from the second command with the UID column in the PV list. There must be no PV associated with this claim, and Used By in the claim’s details must show no Pod using it. All these checks must pass; Pending status alone is not enough.
The last command searches AWS for disks using the driver’s standard tags. If provisioning was previously attempted, an empty result alone does not prove that no disk was created. Also inspect the CSI controller logs, using the commands in the troubleshooting section below, and the EC2 console’s Volumes list in the same AWS account and region. A permission error is not an empty result. If you find an associated disk or cannot establish whether one exists, stop before deletion.
Caution
This procedure applies only to an incorrect claim confirmed to have no PV, disk or data. The saved YAML file preserves the resource definition; it is not a data backup. Do not delete the claim if it has become Bound or its data status is uncertain. This procedure does not migrate data.
If all checks pass, create the replacement file below in the same terminal. It selects the storage class you just checked. 5Gi requests five gibibytes of capacity, ReadWriteOnce allows read-write access from a single node, and Filesystem means the disk will be used as a filesystem. Run the deletion command separately and wait for it to complete before running the apply command:
cat > ./pvc-demo/pvc.yaml <<'EOF'
apiVersion: v1
kind: PersistentVolumeClaim
metadata:
  name: app-data
  namespace: pvc-demo
spec:
  storageClassName: gp3-demo
  accessModes:
    - ReadWriteOnce
  volumeMode: Filesystem
  resources:
    requests:
      storage: 5Gi
EOF
kubectl delete pvc app-data -n pvc-demo
kubectl apply -f ./pvc-demo/pvc.yaml
kubectl describe pvc app-data -n pvc-demo
If deletion does not complete, do not force it or remove protection fields. Investigate why it is waiting before applying the replacement claim. After a successful apply, the new claim’s details should show gp3-demo as its class. With no consumer Pod yet, it is expected to remain Pending because of WaitForFirstConsumer. Its events should now indicate that it is waiting for a consumer, rather than reporting a missing class.
If you need to roll back, repeat the checks above on the new claim: it must still be unbound, unused and have no associated disk or data. Edit a copy of your saved pvc-before.yaml: remove the top-level status field; under metadata, remove uid, resourceVersion, creationTimestamp, managedFields, and controller-added annotations and finalizers. Make these edits only in the file copy; do not remove protection fields from the live resource.
Then delete the empty replacement claim, wait for deletion to finish, and apply the cleaned file. This restores only the previous claim definition; it does not resolve the gp3-typo error. If you are continuing with the corrected claim instead, leave it in place and create its consumer Pod in the next step.
Create the consumer Pod and verify disk access
Once app-data uses the correct class, create the consumer Pod: the Pod that uses the claim. With WaitForFirstConsumer, the scheduler-the component that chooses which node runs a Pod-first determines suitable placement. The CSI driver then creates the disk to match that placement. This avoids creating a disk in an availability zone where the Pod cannot run.
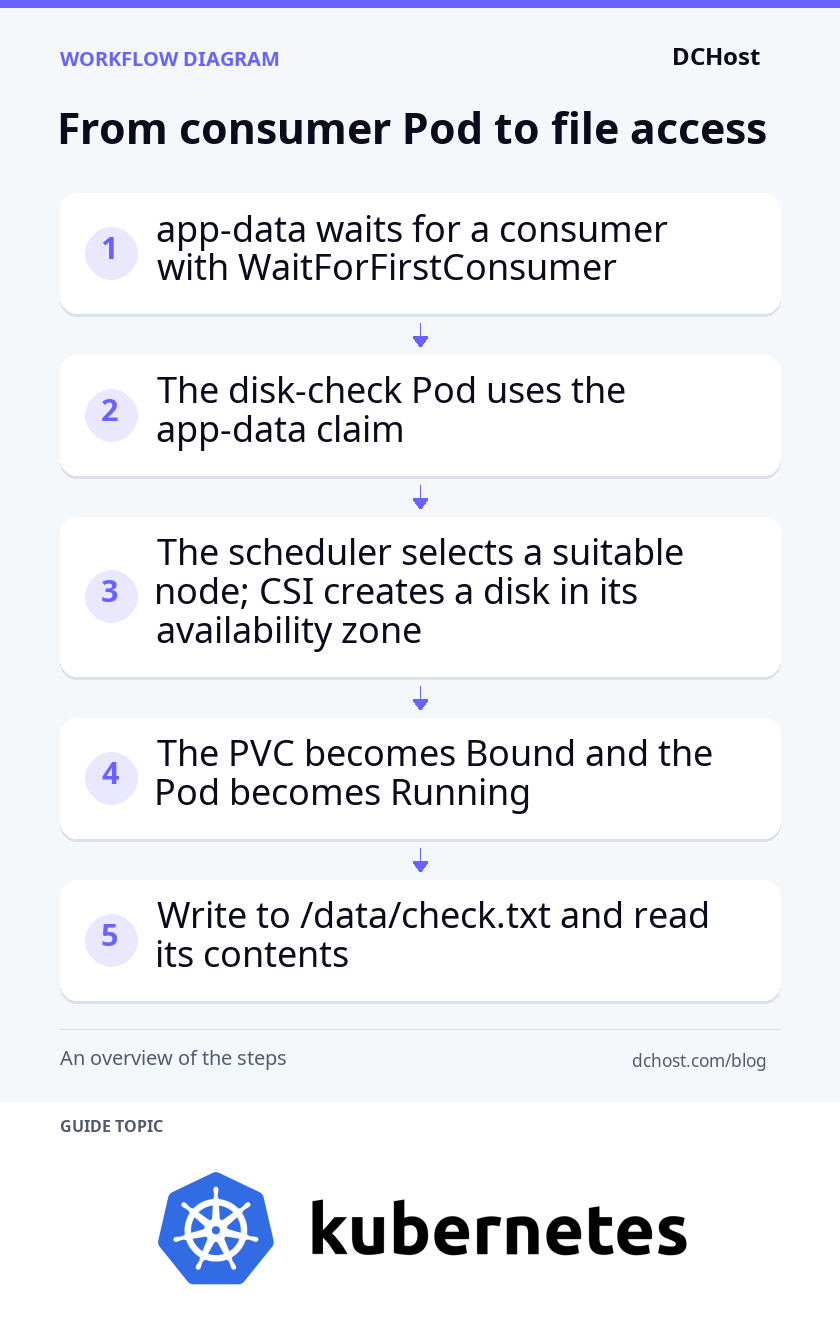
Start the Pod that uses the claim
Create and apply the following file in your administrator terminal. The Pod runs in the same pvc-demo namespace as the PVC. The field claimName: app-data selects the claim, and mountPath: /data makes the disk’s filesystem accessible at that path inside the container.
Your nodes must be able to reach the image registry to download the BusyBox image used here. After applying the file, the final command watches the claim’s status so you can see when storage binding completes.
cat > ./pvc-demo/pod.yaml <<'EOF'
apiVersion: v1
kind: Pod
metadata:
  name: disk-check
  namespace: pvc-demo
spec:
  nodeSelector:
    kubernetes.io/os: linux
  containers:
    - name: check
      image: busybox:1.36
      command: ["sh", "-c", "sleep 86400"]
      volumeMounts:
        - name: data
          mountPath: /data
  volumes:
    - name: data
      persistentVolumeClaim:
        claimName: app-data
EOF
kubectl apply -f ./pvc-demo/pod.yaml
kubectl get pvc app-data -n pvc-demo -w
The expected transition is from Pending to Bound. Stop watching with Ctrl+C; this does not delete any resources. If the status does not change, stop the watch and inspect the events as shown below. Do not add nodeName to the Pod definition: assigning a node directly bypasses the scheduler and can leave the claim Pending in this binding mode.
An AWS region contains multiple availability zones: eu-central-1 is a region, while eu-central-1a is an availability zone within it. An EBS disk must be in the same availability zone as the EC2 node that uses it. This example does not select a zone manually. When choosing a suitable Linux node, the scheduler also considers where the storage can be used.
Verify binding and file access
After stopping the watch, run these commands in the same terminal. The first waits for the Pod to become ready. The remaining commands show the claim’s status, the node assigned to the Pod and the nodes’ availability zones. Here, 180s is only the command’s timeout, not a guarantee of disk provisioning time.
kubectl wait -n pvc-demo --for=condition=Ready pod/disk-check --timeout=180s
kubectl get pvc app-data -n pvc-demo
kubectl get pod disk-check -n pvc-demo -o wide
kubectl get nodes -L topology.kubernetes.io/zone
The PVC should be Bound, the Pod should be Running, and the ready container count should be 1/1. Find the node named in the Pod output’s NODE column in the node list. Its zone label tells you which availability zone the Pod is running in.
If the wait times out, read the Events sections in the following outputs to identify where the process has stalled. Use those messages to guide the next check rather than recreating resources:
kubectl describe pvc app-data -n pvc-demo
kubectl describe pod disk-check -n pvc-demo
If the Pod is ready, run the following command from your terminal to test file access. It writes a file to the container’s disk-mounted /data directory, then reads the contents only if the write succeeds. set -C prevents overwriting an existing file with the same name.
kubectl exec -n pvc-demo disk-check -- sh -c 'set -C; printf "disk kontrolu tamam\n" > /data/check.txt && cat /data/check.txt'The expected output is disk kontrolu tamam. If the file already exists, read it with kubectl exec -n pvc-demo disk-check -- cat /data/check.txt; this checks reading but does not perform a new write.
A successful write and read demonstrate that the mounted filesystem is usable, not just that the PVC is bound. This check does not test whether data persists after recreating the Pod or whether you can restore it from a backup.
If Pending persists, check CSI, capacity and access modes
If your PVC remains Pending, follow the cause reported in its events rather than changing several settings at once. Run the following commands in the same administrator terminal. After each correction, look for new events in kubectl describe pvc app-data -n pvc-demo; older errors may remain visible even after the problem is resolved.
Identify permission errors in CSI logs
ExternalProvisioning alone is not a permission error; it means Kubernetes is waiting for the component that provisions the disk. If you see ProvisioningFailed, read the accompanying message, then inspect the CSI controller logs. The first command shows disk-operation logs; the second shows logs from the component coordinating provisioning. Both retrieve entries from the last 15 minutes:
kubectl logs -n kube-system deployment/ebs-csi-controller -c ebs-plugin --since=15m
kubectl logs -n kube-system deployment/ebs-csi-controller -c csi-provisioner --since=15m
These commands select a controller Pod rather than collecting logs from every controller Pod. If the relevant error is missing, inspect the other controller Pods’ logs too. Messages containing UnauthorizedOperation or AccessDenied can identify the denied action and resource, helping you locate the permission problem.
In the AWS console, open IAM – Roles and select the CSI role you checked earlier. Save a copy of the permissions policy before editing it, then address the denied action and resource without granting unrelated access. If the message mentions an encryption key in KMS, AWS’s key management service, inspect that key’s policy too. Adding permissions to your administrator user does not change the CSI role’s permissions.
After saving the correction, check the logs and PVC events during the next provisioning attempt. The same denial should no longer recur, and provisioning should progress. If you need to undo the policy change, restore the saved policy.
Distinguish quotas from actual capacity shortages
exceeded quota can point to a Kubernetes quota, while VolumeLimitExceeded can indicate an AWS-side limit. A quota caps your allowed usage; available capacity describes whether the provider can supply the disk at that moment. To check namespace quotas, compare their current usage with their limits:
kubectl describe resourcequota -n pvc-demoIn the output, Used shows current usage and Hard shows the allowed limit. A Kubernetes quota usually rejects claim creation or expansion, so it does not, by itself, explain why an existing claim remains Pending.
For an AWS limit, select the region used for the example, open Service Quotas and inspect the Amazon EBS quotas. Compare usage with the limit named in the error. If that limit has been reached, request an increase for the specific quota rather than deleting disks as your first response.
For provider capacity errors such as InsufficientCapacity, a quota increase may not help. Check any availability zone identified in the message and monitor the driver’s subsequent provisioning attempts if the shortage is temporary. Consider another zone only if the Pod’s placement requirements and the data’s location allow it; changing placement does not move an existing disk. Check for new provisioning events and the PVC becoming Bound to see whether the correction worked.
Check access modes and static PV matching
If an event reports unsupported access mode or no suitable volume, run these commands in your administrator terminal. Compare the claim’s requested access mode and capacity with what the storage can provide:
kubectl get pvc app-data -n pvc-demo -o yaml
kubectl get pv -o yaml
The gp3 disk in this example cannot satisfy ReadWriteMany, which requests writable access from multiple nodes. This example requires ReadWriteOnce: writable access from one node, not necessarily just one Pod. Recreate an incorrect claim only if the earlier checks confirm that no PV, disk or data has been created. If your application needs shared access from multiple nodes, choose storage that supports it rather than reducing the claim’s requirements.
If you use a static PV-a volume created in advance-its capacity must be at least 5Gi for this example. Its storage class must match the claim’s class, and volumeMode must match the requested filesystem or block-device usage. The PV’s access modes must also satisfy the claim. Check any additional matching fields: the claim’s selector requires matching PV labels, its volumeName targets a particular PV, and the PV’s claimRef identifies the claim for which it is reserved.
A PV reserved for another claim or in the Released state is not automatically available for reuse; it may contain old data. Do not remove claimRef until you have confirmed which application owns the data and that reuse is safe. If the data must be preserved, ensure you have a recoverable backup before changing its reservation. Once the claim matches a suitable, available PV, check the claim’s status to confirm that it transitions to Bound.
Find topology constraints through Pod events
kubectl describe pod disk-check -n pvc-demo
kubectl get storageclass gp3-demo -o yaml
kubectl get nodes -L topology.kubernetes.io/zone
Run these commands in your administrator terminal to inspect topology constraints: restrictions on where the Pod and its storage can run. The outputs show the Pod’s scheduling events, the storage class’s placement limits and the nodes’ availability zones. FailedScheduling is a general scheduling error. If its message includes volume node affinity conflict, the nodes suitable for the Pod may not match those where the disk can be used.
Compare the Pod’s nodeSelector, which selects nodes by label, and its affinity placement requirements with the storage locations permitted by the class’s allowedTopologies. If a PV is already bound, use the PV output from the preceding check to inspect its nodeAffinity field as well. These comparisons help you identify whether the restriction comes from the Pod, the storage class or the existing disk’s location.
Change only a Pod constraint that you have confirmed is wrong. For the example Pod, first save a copy of pod.yaml, then edit the incorrect placement requirement in that file. If writes are in progress, stop them safely and flush pending writes before deleting only the disk-check Pod and reapplying the edited file. Do not delete the PVC; keeping it preserves the connection to the existing storage. To roll back the placement change, repeat the Pod replacement using the saved definition.
If no suitable node exists in the disk’s availability zone, provide node capacity in that zone. Changing a node’s zone label does not move either the disk or the node and will not solve the problem. Run the Pod description command again after the correction: the Pod should have a node assigned, and no new scheduling errors should appear. Once it is ready, return to the earlier file-access check to confirm that it can use the disk.
Frequently Asked Questions
Can a Pod use a PVC from another namespace?
No. A Pod can directly use only PVCs in its own namespace. That is why the disk-check Pod and the app-data claim both belong to pvc-demo in the example. Creating a PVC with the same name in another namespace creates a separate storage request; it does not give you access to the existing disk. A PV belongs to the cluster rather than a namespace, but it binds to only one PVC at a time.
If you are moving your application to another namespace, plan to create separate storage at the destination and transfer the data in a controlled way. Trying to share the same EBS disk through two separate PV records is not a safe shortcut.
Does changing the StorageClass move an existing disk?
No. A StorageClass defines how storage is provisioned; it does not move existing data to another disk or availability zone. You cannot change a bound PVC’s storageClassName field through a normal update. Changing the default class does not convert existing claims that already have a class assigned, either.
To move to a different class, create a new PVC that uses the target class. Transfer the data using a backup-and-restore or data-copying method appropriate for your application. During the final transfer, stop application writes or use a synchronization method your application supports. Check that the destination data is complete and readable before switching the application to the new claim. Keep the old disk so you can roll back until you have confirmed that the application works with the new storage.
Does disk data survive Pod deletion?
In this example, yes: deleting only the disk-check Pod does not delete the separately created app-data PVC or the EBS disk. A recreated Pod can access the saved files at the same path if it mounts the same PVC at /data. Temporary files in the container’s own filesystem do not have this protection. Pending writes held in memory but not yet saved to disk can also be lost.
Deleting the PVC is a different operation. The example’s Retain policy preserves the disk but does not automatically bind its existing data to a new claim. With a Delete policy, the disk may also be deleted after the PVC is removed. Before testing persistence by deleting the Pod, stop application writes safely and flush pending writes from memory to disk.
Is a disk snapshot enough for an application backup?
Not always. A disk snapshot captures storage at a particular point in time. It does not include data waiting in a running database’s memory, and it does not by itself guarantee consistency for operations spanning multiple disks. The database may need to perform recovery when restored.
Use a backup method supported by your database, or pause writes using an application-supported procedure and flush pending data to disk before taking the snapshot. Also securely back up your Kubernetes manifests-the resource definition files-along with the required settings and secrets. Restore the backup in a separate environment, then check that the application starts and can read the data you expect.
Closing checklist: Hand storage over to your application
Before handing storage over to your application, check not only that the PVC is bound but also that the Pod can use the disk. Complete this checklist in the same administrator terminal:
- PVC/PV binding: In the output of
kubectl get pvc app-data -n pvc-demo -o wide, the status should beBound, the capacity5Giand the classgp3-demo. Find the PV shown in theVOLUMEcolumn in the PV list; that record’sCLAIMfield should point topvc-demo/app-data. - Pod placement: In the output of
kubectl get pod disk-check -n pvc-demo -o wide, check that the status isRunningand a node has been assigned. If you previously saw a topology error, compare the node’s availability zone with the PV’s placement requirements; they must be compatible. - Writing and reading: Read the value you wrote to
/data/check.txtduring the earlier file check again usingkubectl exec -n pvc-demo disk-check -- cat /data/check.txt. You should see the expected contents; a running Pod alone does not prove it has write access. - New events: Check the event timestamps in the output of
kubectl describe pvc app-data -n pvc-demoandkubectl describe pod disk-check -n pvc-demo. Focus on whether the same error recurs after the fix, rather than whether old warnings remain in the list.
If the claim is still Pending, return to the checks for the storage class, consumer waiting or the CSI driver’s disk provisioning process. If the claim is Bound but the Pod cannot start, follow the scheduling, disk attachment and filesystem mount errors in the Pod events.
If the Pod runs but cannot write, first inspect the mount path, read-only setting and file permissions; do not recreate the PVC. To track problems once storage is working, continue with setting up Kubernetes monitoring.
Clean up the test resources while protecting data
If you are removing the test resources, first save the disk identity and the reclaim policy currently set on the PV. Run the following commands in your administrator terminal only after the PVC is Bound; if the PV name is empty, do not proceed with deletion:
PV=$(kubectl get pvc app-data -n pvc-demo -o jsonpath='{.spec.volumeName}')
kubectl get pv "$PV" -o yaml > ./pvc-demo/pv-before-cleanup.yaml
kubectl get pv "$PV" -o jsonpath='{.spec.persistentVolumeReclaimPolicy}{"\n"}{.spec.csi.volumeHandle}{"\n"}'
The first output line should show the expected policy, Retain, and the second should show the EBS disk ID. The saved YAML contains only the resource definition; it is not a data backup. If you need to keep any data, take an application-appropriate backup and verify that you can restore it before deleting anything. If the policy shows Delete, do not follow the deletion steps below: deleting the PVC could also delete the disk, so the disk-preserving workflow described here would not apply.
After confirming that the policy preserves the disk and that only disposable test data remains, remove the consumer Pod first, then the claim:
kubectl delete pod disk-check -n pvc-demo
kubectl delete pvc app-data -n pvc-demo
kubectl get pv "$PV"
With Retain, the PV is expected to enter the Released state; the EBS disk remains and may continue to incur charges. This step does not delete the disk, but it does not automatically bind the old data to a new claim either.
For permanent cleanup, open EC2 – Volumes in the AWS console and find the saved disk ID in the region used for the example. After confirming that the disk is detached and no longer needed, delete it using Actions – Delete volume. This removes the data on the disk; if you need to keep any of it, do not proceed until you have a verified recovery path from backup.
Once you have confirmed that the disk is deleted, remove its Kubernetes record with kubectl delete pv "$PV". If no other claim uses the example-specific class, you can also remove it with kubectl delete storageclass gp3-demo.