Quick summary
Proxmox Backup Server stores your server backups on a separate system so you can recover from dated restore points.
- First, install PBS and prepare the datastore.
- Use a limited-permission user and token for connections rather than an administrator account.
- After taking your first backup through PVE, check it by restoring to a separate machine.
If your site stops loading after a WordPress update or a server disk fails, you need a way to return to working data. Keeping backups separate from the affected disk preserves your recovery options.
What is the difference between PBS and PVE?
Proxmox Virtual Environment (PVE) is the platform that runs virtual machines (VMs) and containers. Proxmox Backup Server (PBS) is an open-source backup server that stores backups of those systems and files from Linux systems. The area where PBS manages backups is called a datastore.
PBS reduces transfer and storage requirements by transferring changed data and avoiding duplicate storage of shared data chunks. Even so, each snapshot, in the backup context, is a dated restore point. A snapshot on the source disk is not an independent backup on its own; if that disk is lost, the snapshot may be lost too.
Example scenario: In the hypothetical environment used here, the PBS address is pbs.example.net, the datastore is backup, and the storage ID used for this datastore in PVE is pbs-main. Our sources are the virtual machine VM100 and the Linux server linux01. The preparation below follows this example; adapt the values to your own environment.
Install PBS from the ISO
Plan to run PBS on a separate system so that a failure on the source server does not also destroy your backups. In this example, the operating system disk and backup data storage are separate. Download the PBS installation ISO from the official Proxmox download page, then boot the server from it using USB or remote management.
The installation disk will be erased
The installer erases data on the target disk you select. Check the disk’s identity and capacity; do not select a disk containing existing backups or files you need to keep. If the disk contains data you need, copy it to another storage device first and confirm that the copy is readable. Returning to the previous state after installation requires recovery from that copy.
- In the boot menu, select Install Proxmox Backup Server (Graphical). When the graphical installer opens, read and accept the license agreement to reach the target disk screen.
- Select the disk you set aside for the operating system. The Options button opens the filesystem settings; use the default
ext4for this example. The location settings appear next. - Set the country, time zone, and keyboard layout. For our example based in Turkey, select
Europe/Istanbuland the Turkish keyboard layout you use. The administrator details screen follows. - Enter the
rootadministrator password and the email address where you want to receive notifications. This password is for signing in to the PBS interface; it is separate from the connection secret you will create later.
Configure the management network
After saving the administrator details, set the network address you will use to reach the PBS interface. The screenshot shows these fields; adapt the values in step 5 to your own network.
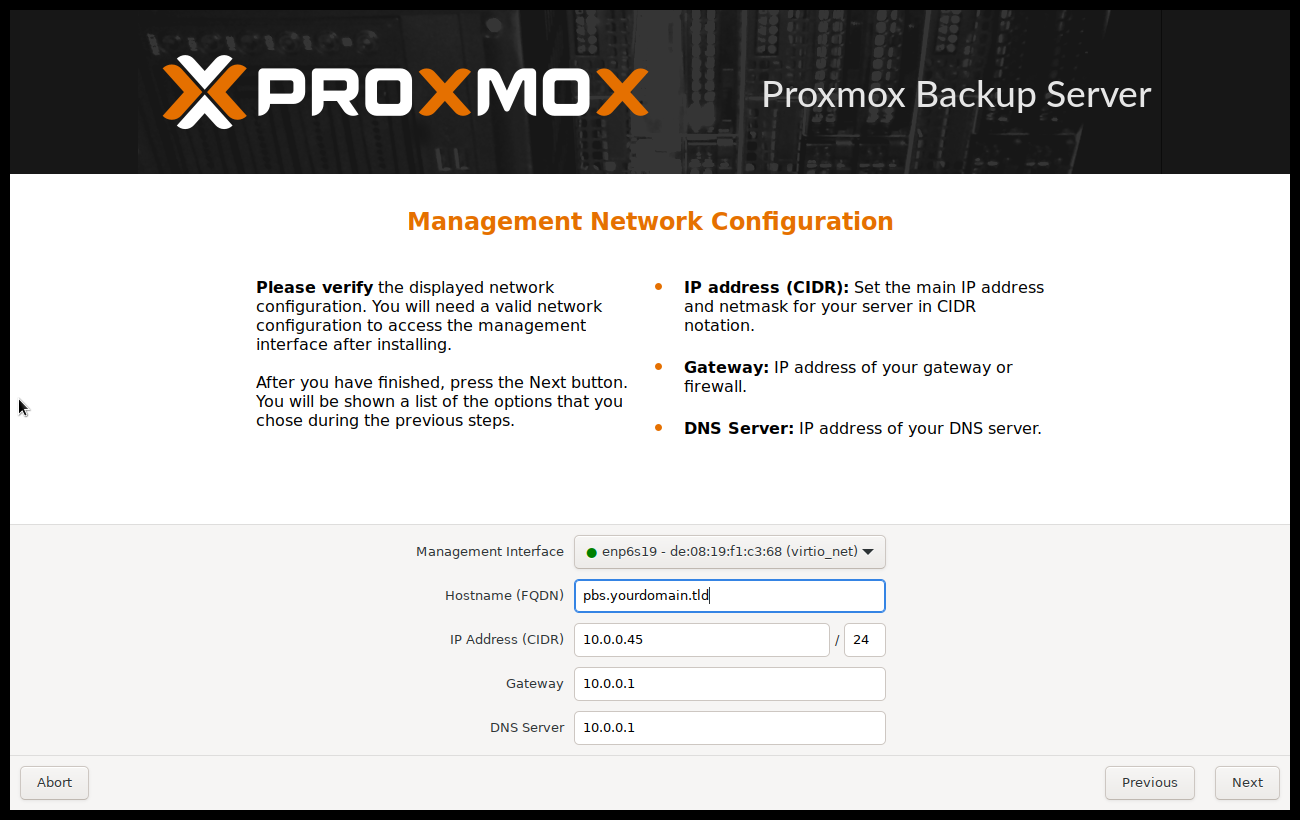
- On the network screen, select the management network interface. In our example network, the static address is
192.168.10.20/24, the gateway and DNS server are192.168.10.1, and the hostname ispbs.example.net. These values apply only to this hypothetical network; enter values appropriate for your actual network and make sure the DNS name resolves to the PBS address. - On the summary screen, check the disk and network details. If anything is incorrect, use Previous to go back. Install starts disk formatting and package installation. Once it finishes, remove the installation media and restart the system.
- Open
https://pbs.example.net:8007in your browser. Userootas the username, select Linux PAM standard authentication as the authentication realm, and enter the installation password. The full account ID isroot@pam. Once signed in, check the hostname, IP address, and time settings.
If you see a certificate warning on first access, verify the server you are connecting to through a trusted console or management connection. Disabling certificate checks is not a permanent solution. When the interface opens, PBS is installed, but you have not yet created a datastore or a backup.
Turn prepared storage into a datastore
A backup disk and a datastore are not the same thing. First, you prepare the disk for use, then tell PBS which directory on that disk should hold the backups. If you already have backup storage prepared and mounted, you can go straight to Add Datastore.
- To prepare an empty data disk, open Administration – Storage/Disks in PBS. Check the disk’s identity and capacity to make sure you are not confusing it with the system disk. The formatting step that follows erases data on the selected disk.
- In the filesystem creation workflow under Directory, select this empty disk and a supported filesystem, either
ext4orxfs. In our example, name the storage areabackup. - When the process finishes, check the mount path in the interface; this example uses
/mnt/datastore/backup. This directory must actually reside on the data disk you prepared. Entering a directory name alone does not mount a disk. - If a datastore was also created during this process, open
backupon the left; do not create the same datastore again. If only the disk storage was prepared, complete the form below.
Complete the Add Datastore form
Open Datastore – Add Datastore on the left. The form layout may vary by version, but fill in the main fields as follows:
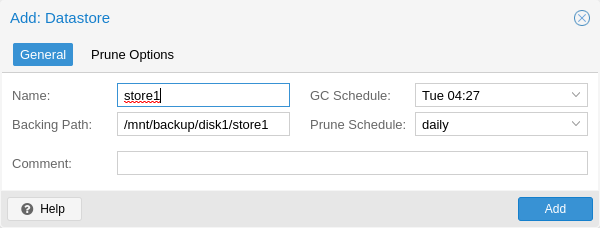
- Name – the datastore name:
backup. - Backing Path – the directory that will hold the data:
/mnt/datastore/backup. - GC Schedule – the schedule for cleaning up unused data chunks: select a daily schedule for this example. This process does not create backups.
- Prune Schedule – the schedule for removing old restore points: leave it disabled during this preparation stage.
- Prune Options – retention rules, which determine how long backups are kept and which copies are retained: do not define any rules yet.
- Comment – an optional description:
VM100 and linux01 backups.
Finish creating the datastore, then open backup on the left. It is normal for its contents to be empty. Its capacity should match your separate data storage; if you see the system disk’s capacity, check which filesystem contains the directory.
Prepare the service user and connection secrets
Under Configuration – Access Control – User Management, create the backup user in the pbs authentication realm for automated connections. The account ID will be backup@pbs; creating it does not, by itself, grant access to the datastore.
Under API Tokens, create a token named pve01 for this user. A token is an identity used by an application to access PBS. Its full ID will be backup@pbs!pve01. The displayed token secret acts like a password for this identity and is shown only once. Save it in a password manager. For the Linux server, repeat the process with the name linux01 to create the separate identity backup@pbs!linux01.
Under Configuration – Access Control – Permissions, add each of the following entries separately:
| Path – permission scope | User or token | Role |
|---|---|---|
/datastore/backup | backup@pbs | DatastoreBackup |
/datastore/backup | backup@pbs!pve01 | DatastoreBackup |
/datastore/backup | backup@pbs!linux01 | DatastoreBackup |
This path defines the permission scope in PBS, not a directory on disk. PBS checks both the user and token permissions; granting permission only to the user is not enough. DatastoreBackup allows the identity to create and restore its own backups, but does not grant permission to prune old backups.
Final checks before connecting
The Fingerprint is the SHA-256 fingerprint of the server certificate. If the certificate cannot be verified through a trusted certificate authority, obtain this value from Dashboard in the trusted PBS interface. The token secret authenticates your access, while the fingerprint verifies the certificate of the server you are connecting to; neither is a backup encryption key.
- Check DNS resolution for the PBS address and access to TCP port 8007 from PVE.
- Confirm that you have the datastore name, token IDs, and securely stored secrets ready.
- Next, add the PBS connection in PVE with the name
pbs-main. VM backup and client-side encryption steps follow this preparation.
Create your first backup with PVE
By the end of this walkthrough, you will have a backup of a virtual machine (VM) from Proxmox VE (PVE) stored on Proxmox Backup Server (PBS). You will then restore it as a separate VM to check that it works and schedule the same backup job.
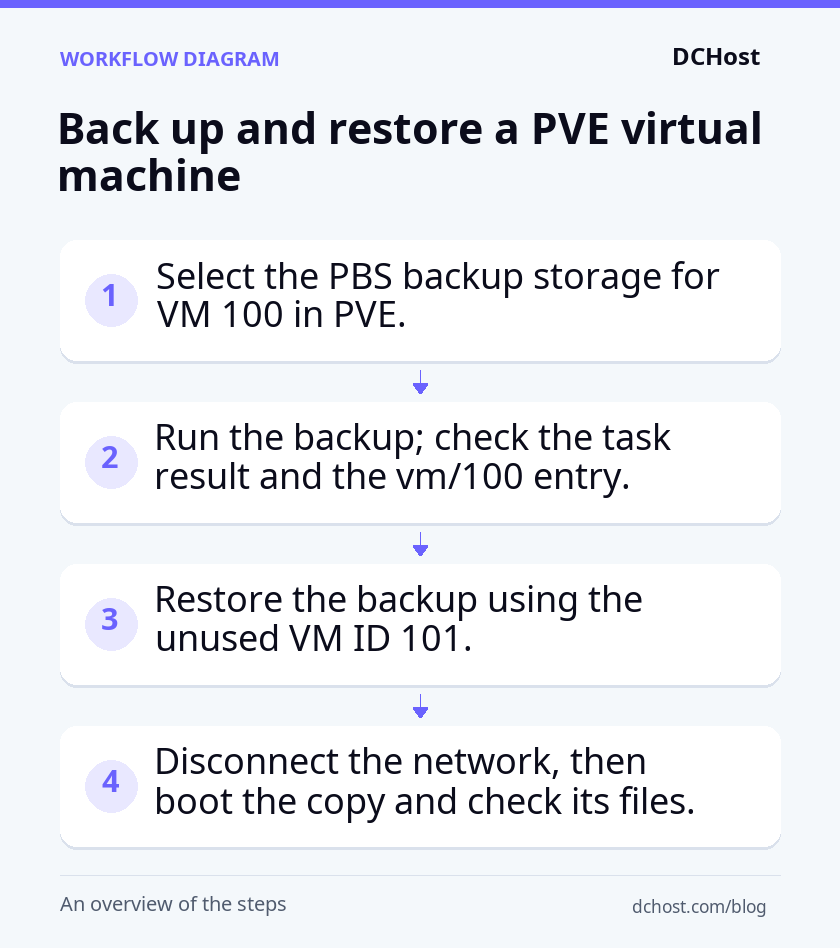
Example scenario: In this example, you will back up VM 100. The PBS address is pbs.example.net, the prepared datastore is named backup, and the API token ID with access permissions is backup@pbs!pve01. An API token consists of an ID and its associated secret, which PVE uses to connect to PBS. Replace the address and credentials with those for your environment. The PVE node must be able to reach PBS on TCP port 8007.
Add PBS through Datacenter > Storage
Switch from the PBS interface to the PVE interface. Open Datacenter > Storage > Add > Proxmox Backup Server. This entry tells PVE where to send backups; it does not create a new datastore on PBS.
| Field | Example value and explanation |
|---|---|
| ID | pbs-main: The storage name you will select in PVE menus and backup jobs. |
| Server | pbs.example.net: The DNS name or IP address of PBS. Do not enter the web interface URL beginning with https://. |
| Datastore | backup: The name of the datastore you previously created on PBS, not a directory path or PVE storage ID. |
| Username | backup@pbs!pve01: The full token ID, including the user, authentication realm and token name. |
| Password | The secret displayed when the token was created. Enter this token’s secret, not the PBS administrator password. |
| Fingerprint | Required if the certificate cannot be validated through a trusted certificate authority (CA). Access the PBS interface through a trusted management connection and obtain the verified SHA-256 certificate fingerprint from Dashboard. A separate fingerprint is not required if CA trust is established. |
Click Add to save, then open pbs-main under the node in PVE. If the capacity information and Backups list load without a connection error, access is working. The list may be empty on first use; you have not created a backup yet.
Start the first backup of VM 100
First, open VM 100 > Hardware. Select each disk you want to protect and check the Backup option in its Edit dialog, showing the advanced fields if necessary. A disk with this option disabled will not be included. This lets you confirm that the backup covers the disk containing application data as well as the system disk.
- Open VM 100 > Backup > Backup now. Select
pbs-mainin the Storage field. - Set Mode to Snapshot. This mode backs up the VM while it is running. Click Backup to start the task and wait for it to finish.
- Review the log in the task window. Check for
TASK OK, which indicates successful completion, and any warnings about what was included. Do not rely solely on the progress bar reaching the end. - In the PBS interface, open Datastore > backup > Content. Find the new snapshot (the dated restore point) in the
vm/100group and compare its timestamp with the task you ran. Account for any time zone difference between the interfaces.
Restore as VM 101 and isolate it from the network
A listed backup does not prove that the application can start. Test the restore using VM ID 101, after confirming that it is unused across PVE, rather than overwriting production VM 100. This test leaves both the production VM and the backup on PBS intact.
- In PVE, open pbs-main > Backups under the node. Select the backup of VM 100 you just created and click Restore.
- Enter
101in VM ID. For Storage, select VM disk storage with enough free space. In this example, that storage is calledlocal-lvm. This is not the PBS datastore. - Leave Start after restore unchecked. Start the restore and wait for the task to complete successfully.
- While VM 101 is powered off, open each network adapter in Hardware and select Disconnect. This prevents the copied VM from joining the production network with the same IP address. Also disable Options > Start at boot.
- Once network isolation is in place, start VM 101. Log in through Console and check that the operating system boots, sample files are readable and the application works from within the VM. For a database-backed application, also open the records you expect to find. A VM merely showing as running is not enough to confirm success.
A brief note on consistency and LXC backup coverage
QEMU Guest Agent (QGA) is a helper service running inside the guest operating system; it is not the client that sends backups to PBS. To use it, install and start it in the guest, then enable communication through Options > QEMU Guest Agent in PVE. Fully shut down and start the VM during a maintenance window for the newly enabled setting to take effect. QGA helps with consistency by briefly pausing filesystem writes. On Windows, it uses Volume Shadow Copy Service (VSS); the application’s VSS support and state affect the result. QGA alone does not guarantee database consistency.
Snapshot backup mode for VMs does not require snapshot support on the source storage. For LXC containers, however, the included storage volumes must support snapshots. Storage mount points other than the LXC root disk must have Backup selected. The contents of bind mounts and device mounts, which directly attach a host directory or device, are not included in this backup.
Schedule the same backup
Open Datacenter > Backup > Add. In Node, select the node hosting VM 100. Set Storage to pbs-main, include only VM 100 and select Snapshot mode. For Schedule, enter a daily time such as 03:00, then check the time zone and the next run time shown. Save the job with scheduling enabled.
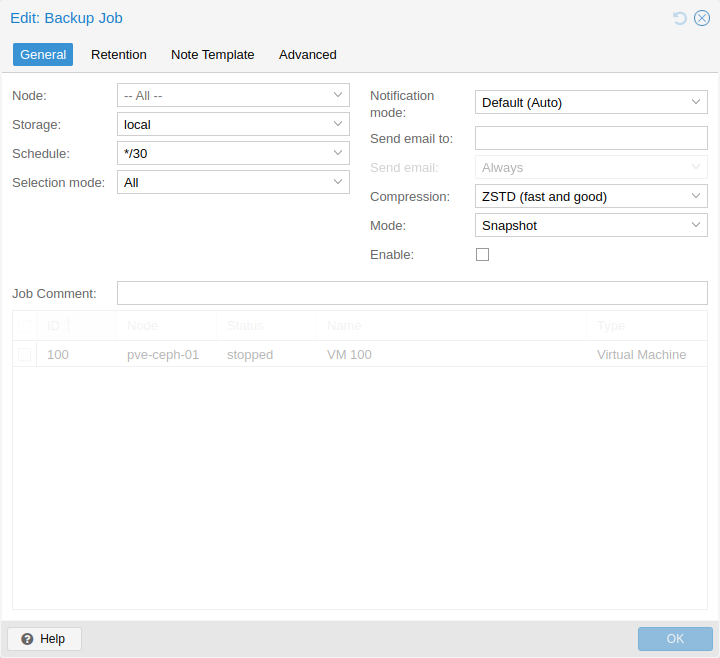
After the first scheduled run, check that the task log shows success and that PBS contains a new backup of VM 100 with the corresponding timestamp. This confirms that the saved schedule works, not just the manually started backup.
Back up files from a Linux server
You can use the official proxmox-backup-client to send files from a physical Linux server, or one running outside Proxmox VE (PVE), to Proxmox Backup Server (PBS). PVE’s built-in virtual machine backup process does not require this client to be installed in the guest operating system. The method below is for backing up selected directories separately from within Linux.
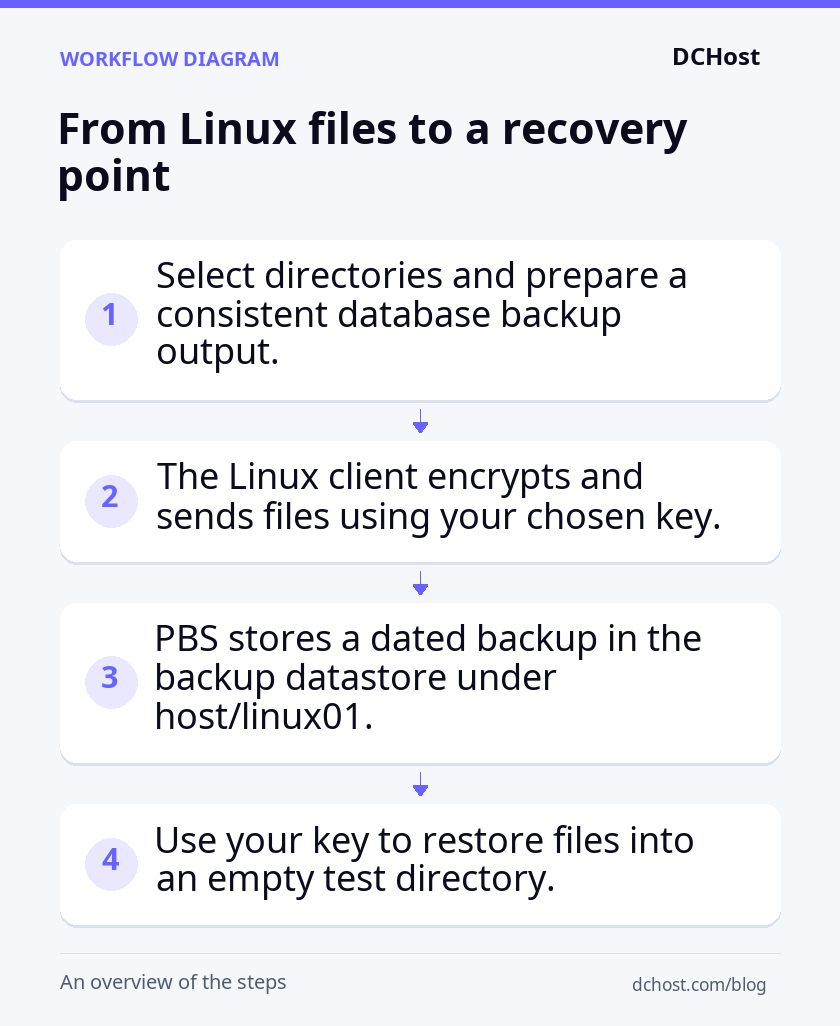
Example scenario: You will send files from a Linux server that uses the APT package manager and is supported by the official client repository to the backup datastore on pbs.example.net, using the backup ID linux01. A datastore is the area where PBS stores backups. Run the commands as root on the Linux server that holds the files, not on PBS. Replace the address with your own PBS address; the client initiates the connection.
Prepare the client and protected files
Follow the Client Installation section in the official Proxmox Backup Server Documentation. Before running the APT commands, use those instructions to add the client package repository that matches your distribution and release, with signature verification configured. Do not guess the distribution codename or use a repository for a different Debian release. If the APT method is not supported, assess whether the documented static client is suitable for your environment.
We assume that the backup datastore and the backup@pbs!linux01 API token with permission to back up to it are already configured in PBS. An API token is the client’s authentication credential; its ID and secret value are different. The Linux server must be able to reach PBS over TCP port 8007, and certificate trust must already be configured.
The following block is for the initial setup: it prepares the protected directory without overwriting existing password files or the key. Directory permissions of 0700 allow access only to root; file permissions of 0600 allow only root to read and write. The key creation command prompts you for an encryption passphrase.
apt update
apt install proxmox-backup-client

umask 077
install -d -m 0700 /root/.config/proxmox-backup
for pbs_secret_file in /root/.config/proxmox-backup/token.secret /root/.config/proxmox-backup/encryption.passphrase; do
  if [ ! -e "$pbs_secret_file" ]; then
    install -m 0600 /dev/null "$pbs_secret_file"
  fi
done
touch /var/log/pbs-linux01-backup.log
chmod 0600 /var/log/pbs-linux01-backup.log

export PBS_REPOSITORY='backup@pbs!linux01@pbs.example.net:backup'
export PBS_PASSWORD_FILE='/root/.config/proxmox-backup/token.secret'
# Enable with the actual value only if the certificate cannot be verified by a CA:
# export PBS_FINGERPRINT='VERIFIED_SHA256_FINGERPRINT_FROM_PBS'

# Initial setup only; the key passphrase is requested interactively.
if [ ! -e /root/.config/proxmox-backup/linux01.key ]; then
  proxmox-backup-client key create /root/.config/proxmox-backup/linux01.key
fi
chmod 0600 /root/.config/proxmox-backup/linux01.key
Now, in your root session, use a text editor to put only the token’s secret value in token.secret and the passphrase you chose when creating the key in encryption.passphrase. Save each value on a single line without quotation marks, keeping root ownership and 0600 permissions on both files. Do not put passwords on the command line or in the script. PBS_PASSWORD_FILE points to the token file, while PBS_ENCRYPTION_PASSWORD_FILE points to the encryption passphrase file.
--keyfile enables client-side encryption, which is separate from securing data in transit. Do not generate a new key on each run. Keep secure recovery copies of the key and its passphrase separate from both the source server and the datastore. If you lose them, the token cannot decrypt your data.
Back up directories and the database export
For this example, the directories /etc, /var/www and /srv/db-backups must exist. Use your database’s own export or backup tool to create a consistent export in the last directory. Do not start archiving until that process has completed successfully; an export that is still being written, or a copy of live database files, does not constitute a usable database backup.
.pxar is an archive format for files and directories. The backup covers these selected directories. Restoring a complete system onto an empty disk requires a separate recovery plan. Other filesystems mounted beneath the selected directories are not included automatically either. Add them as separate archive sources, or deliberately expand the scope with --include-dev. For a network share, first check that it is actually mounted and that its files can be read.
Save the following script, a file that runs commands in sequence, as /usr/local/sbin/pbs-linux01-backup. Give it root ownership and 0700 permissions. The flock command must be installed; it usually comes from the util-linux package. The lock in the script prevents overlapping runs of the same job. If you plan to generate the database export automatically, add the relevant command after the lock and before the backup command; a failed export must prevent the backup from proceeding.
#!/bin/sh
set -eu
umask 077
exec 9>/run/lock/pbs-linux01-backup.lock
flock -n 9 || { echo 'linux01 backup job is already running' >&2; exit 1; }

export PBS_REPOSITORY='backup@pbs!linux01@pbs.example.net:backup'
export PBS_PASSWORD_FILE='/root/.config/proxmox-backup/token.secret'
export PBS_ENCRYPTION_PASSWORD_FILE='/root/.config/proxmox-backup/encryption.passphrase'
# Enable with the actual value only if the certificate cannot be verified by a CA:
# export PBS_FINGERPRINT='VERIFIED_SHA256_FINGERPRINT_FROM_PBS'

proxmox-backup-client backup \
  etc.pxar:/etc \
  web.pxar:/var/www \
  dbdump.pxar:/srv/db-backups \
  --backup-id linux01 \
  --keyfile /root/.config/proxmox-backup/linux01.key

proxmox-backup-client snapshot list host/linux01
Check the first run and schedule the job
After saving the script, run the following commands in a root terminal. The first two lines set the file’s ownership and execution permissions; the third starts the backup. On the last line, $? is the script’s exit code: zero indicates success, while other values indicate an error.
chown root:root /usr/local/sbin/pbs-linux01-backup
chmod 0700 /usr/local/sbin/pbs-linux01-backup
/usr/local/sbin/pbs-linux01-backup
echo $?
If the backup fails, set -e in the script prevents it from proceeding to the listing step. Resolve the error before scheduling the job. When the job completes successfully, open the host/linux01 group under Datastore – backup – Content in the PBS panel. You should see a newly dated snapshot, a point in time you can restore from.
Cron is a scheduler that starts commands at specified times. Once you have a workflow that successfully prepares the database export before every run, open the scheduling file with crontab -e in your root session and add this single line:
0 3 * * * PATH=/usr/local/sbin:/usr/local/bin:/usr/sbin:/usr/bin:/sbin:/bin /usr/local/sbin/pbs-linux01-backup >> /var/log/pbs-linux01-backup.log 2>&1
The job runs daily at 03:00 in the client’s time zone. Standard output and errors are appended to the specified log file. After the first scheduled run, compare this file with the timestamp of the new snapshot in PBS. Connect non-zero exit codes to your monitoring system; logging alone does not send notifications. A systemd timer is an alternative, but do not use two schedulers to start the same job.
Restore web.pxar into an empty test directory
In your root session, create the test directory with mkdir -p /srv/restore-test/web. The output of ls -la /srv/restore-test/web should contain only the . and .. entries. If files remain from an earlier attempt, choose a new, empty destination rather than deleting them. Also check that the destination has enough free space. Set the following variables again in your restore session. Select the snapshot you want from the listing and replace the example timestamp in the command with its timestamp. The destination is not your production /var/www directory.
export PBS_REPOSITORY='backup@pbs!linux01@pbs.example.net:backup'
export PBS_PASSWORD_FILE='/root/.config/proxmox-backup/token.secret'
export PBS_ENCRYPTION_PASSWORD_FILE='/root/.config/proxmox-backup/encryption.passphrase'
# Enable with the actual value only if the certificate cannot be verified by a CA:
# export PBS_FINGERPRINT='VERIFIED_SHA256_FINGERPRINT_FROM_PBS'

proxmox-backup-client snapshot list host/linux01

proxmox-backup-client restore \
  'host/linux01/2026-10-13T03:00:00Z' \
  web.pxar /srv/restore-test/web \
  --keyfile /root/.config/proxmox-backup/linux01.key
Check that the expected files are present and readable in the test directory, and that ownership and permissions have been preserved. This restores only the web files; the database export must be restored to a separate test database and tested with the application.
How can you back up other systems?
When adding servers outside PVE to the same backup plan, separate two questions: how will you capture the data, and where will you store the resulting backup? Windows, NAS and databases are sources; S3, a second PBS server and tape are storage destinations or options for additional copies.
| Source or destination | Method | Key limitation |
|---|---|---|
| PVE VM / LXC | Built-in integration from the previous section | Check which disks and mounted directories are included. |
| Linux server | Official Linux client from the previous section | A file backup does not replace a full system recovery plan. |
| Physical Windows server | Output from a VSS-aware backup or export | Requires archiving through Linux or a third-party tool. |
| VMware / Hyper-V | Linux guest client or a consistent platform export | Plan the recovery path for the entire virtual machine separately. |
| NAS: NFS / SMB | File backup from a share mounted on Linux | Check the mount, permissions and preservation of file attributes. |
| Database | Consistent data dump or application backup output | This is not equivalent to copying the live data directory. |
| Remote PBS | Pull/push synchronization | Consider deletion propagation and retention policy together. |
| S3 | Built-in S3 datastore | Requires a persistent local cache. |
| Ceph RBD / RGW | Backup of PVE disks on RBD / S3 destination through RGW | The disk source and backup destination serve different roles. |
| LTO tape | Copy from the datastore to tape | Restore to the datastore first. |
Which approach works for Windows, VMware and Hyper-V?
You can back up a Windows virtual machine on PVE using the workflow in the previous section. For physical Windows servers, the official documentation reviewed does not list an official Windows package equivalent to the Linux client. You can place the completed output from a tool that supports VSS, Windows’ service for consistent snapshots, in a preparation area and archive it with the Linux client. Also plan how you will restore that output using your chosen tool.
On VMware and Hyper-V, backing up files from inside the guest and exporting the entire machine meet different recovery needs. Simply copying a running virtual disk does not produce a consistent backup.
What should you check for NAS and database backups?
For a NAS share, first check that the NFS or SMB network share is actually mounted on Linux. If the connection is lost, the same directory may appear empty, and the job may finish without capturing the files you expected. Include the share explicitly in the backup scope; selecting the root directory does not automatically include every mounted filesystem. Reading files over SMB, in particular, does not guarantee complete preservation of Windows access rules, alternate data streams or system state. Here, you are reading files on the NAS as a source. Storing the PBS datastore itself on a NAS is a separate setup. That storage must meet the datastore’s filesystem requirements.
For databases, visible files are not enough either: the source sent to PBS should be a completed, consistent data dump or the application’s own backup output.
Where do S3 and Ceph fit?
S3 is a backup destination here, not a source. First check that your installed PBS version has built-in S3 support. You will need the service endpoint, a bucket created in advance, access credentials and a persistent local cache. The bucket is the container where objects are stored. This cache is not a temporary working directory. Do not let two PBS servers use the same datastore at the same time.
Ceph RBD can provide the block storage holding PVE virtual disks; Ceph RGW provides S3 access and can serve as a backup destination. Using S3 alone does not make a backup immutable.
How do you use a second PBS server and tape copies?
When copying to a second PBS server, pull means the destination retrieves backups from the source; push means the source sends them to the destination. The remove-vanished option can propagate deletions of backups that have disappeared from the source. Decide which recovery points should survive an accidental deletion, and set the destination’s retention policy accordingly. This policy defines how long backups are kept. Keep the remote copy’s access credentials and retention rules independent of the source server.
With tape, datastore contents are written to tape as a second copy or archive. Recovery first restores the data to a PBS datastore, then to the system you are recovering. This intermediate step counts toward the recovery time.
What should you check after taking a backup?
A successful backup log is only the start of maintenance. Removing old recovery points, reclaiming unused space, verifying integrity and actually bringing the application back online are separate tasks; none replaces the others.
Prune removes old recovery points according to your backup retention rules. Example scenario: You could keep 7 daily, 4 weekly and 6 monthly recovery points. This is not a required policy, but an example to adjust to your capacity and how far back you need to recover. Before enabling deletion, review the points that will be kept in the preview and verify that you have an independent copy of the points you need. Conflicting rules in PVE and PBS can cause a backup you intended to keep to be deleted from the other side.
Garbage Collection (GC) later removes data chunks that no recovery point uses anymore. Prune only removes recovery points, so disk space is not freed immediately. Shared chunks remain, and eligible chunks are removed after a safety waiting period. In PBS, use the datastore’s Prune & GC section to monitor these jobs’ schedules and results.
Verify checks the integrity of stored backup data. You can schedule verification tasks in Verify Jobs to cover all backups; the official documentation recommends re-verifying every backup at least monthly. However, for encrypted chunks whose decryption key is not available on the server, verification is limited to CRC-32 error checking. That alone does not prove that the original content is intact and usable.
An actual restore closes this gap. Restore to a separate destination on an isolated network without overwriting production. Check that the key from your securely stored recovery copy decrypts the data, that permissions are correct and that the application works with the expected records. Recording the time from preparation through application validation makes your recovery plan measurable.
Do maintenance jobs also start Linux backups?
No. Prune, GC and Verify work on existing backups. The job that captures data from Linux must run separately through the client scheduler described in the previous section, and failed jobs must also be monitored.
If you lose the key, is an access token enough?
No. An access token authorizes access to the datastore; it does not replace the encryption key or, if required, the key’s passphrase. Test the key from your recovery copy during an actual restore.
Does restoring one file count as a full system test?
No. It shows that the file can be read, not that the system boots or that the database and application work together. Choose the scope of your test based on the service you need to recover.
Refine your plan after the first backup
- Choose one critical service and document its backup scope and restore destination.
- RPO (recovery point objective): Define how much data loss you can accept, measured in time. Compare this with your backup frequency and the age of the latest usable recovery point.
- RTO (recovery time objective): Define how long you can accept the service being unavailable. Compare this with the total recovery time you measured.
- Record who will monitor maintenance results and failure notifications, and set a date for the next recovery test.
To develop your backup plan further, see our guides to backup encryption and key management and RPO, RTO and disaster recovery planning.
Official sources
Technical details were checked against these official documents on 13 October 2026. Compare interfaces and features with your installed version. Commands use example environment names.
- Proxmox Backup Server: introduction and architecture
- Proxmox VE integration
- Proxmox VE: Backup and Restore
- Proxmox Backup Client: backup, encryption and restore
- Client installation and supported packages
- PBS users, API tokens and access roles
- S3-backed datastores
- PBS remote sync jobs
- Pruning, garbage collection and verification
- Tape backup