Quick summary
To deploy ASP.NET Core on a Windows VPS (virtual private server), install IIS, Windows’ web server, and the Hosting Bundle for your application’s .NET version. Point an IIS site to your published files, set folder permissions and enable HTTPS so visitors can reach your app over an encrypted connection.
- The Hosting Bundle provides the .NET runtime-the components that run your app-and the module that connects it to IIS.
- Transfer Release output, the deployment-ready build, rather than source code.
- Use a dedicated IIS application pool to run your app under its own Windows identity, with only the folder permissions it needs.
- Check HTTPS from outside the VPS and save a copy of the current release before updates so you can roll back.
If your app works locally but fails on the VPS, the cause may be the server setup rather than your code. A missing runtime, an incorrect path to the published files or insufficient file permissions can prevent startup. Check the server components first, then the published files and access settings to narrow down the cause.
Example scenario: this hypothetical walkthrough uses a database-free application with IIS 10 and .NET 10 on Windows Server 2022. You’ll publish the app, make it accessible through your domain over HTTPS, learn how to investigate startup errors and prepare an update process that lets you restore the previous release.
Prepare the example environment: IIS and Hosting Bundle
To serve your application through IIS, install the web server first, then the components that run your application. IIS is Windows’ web server. The Hosting Bundle supplies the .NET runtimes-the software that executes your application-and the module that connects ASP.NET Core to IIS.
Example scenario
In this hypothetical setup, you will use IIS 10 and .NET 10 LTS on a clean Windows Server 2022 x64 VPS. x64 means 64-bit architecture; LTS means long-term support. You will then deploy OrnekWeb, an application that requires no database, to C:\Sites\OrnekWeb.
Prepare access and a recovery path
Connect to the VPS using Remote Desktop and your administrator account. This connection uses RDP, the Remote Desktop Protocol. If the server contains existing data, take a server backup before installing updates or roles, which add server capabilities such as IIS. If you use your provider’s backup service, check its control panel to confirm that the backup has completed and locate the restore option before proceeding. Keep a separate backup of any existing IIS settings, too.
Next, install updates through Windows Update and complete any pending restart. On a server hosting existing sites, schedule a maintenance window because installation and restarts can interrupt service.
Check that you can access your domain’s DNS management panel and note the VPS’s public IPv4 address. DNS holds the records that direct your domain name to the server’s IP address. The example hostname uygulama.example.com is a placeholder; use your own subdomain wherever it appears. If you are moving an existing site, leave its DNS record unchanged for now. You will point it to the VPS once the site is ready.
Install the IIS role and management tools
- Open Server Manager – Manage – Add Roles and Features to launch the installation wizard. Select Role-based or feature-based installation. On the server selection screen, choose the VPS you are connected to and continue.
- Under Server Roles, select Web Server (IIS). In the dialog that appears, click Add Features to include the required management components.
- Continue to the IIS Role Services screen. Keep the default selections and make sure Management Tools – IIS Management Console is selected. This installs the interface you will use to manage sites. ASP.NET Core does not require the older ASP.NET 4.x role service. Continue to the confirmation screen, click Install and wait for the wizard to report a successful installation.
In a browser on the VPS, open http://localhost. On a clean installation, you should see the IIS welcome page. This confirms that the web server responds to an HTTP request from within the VPS; it does not yet confirm access from the internet. You will check external access later.
Install and verify the Hosting Bundle
On the VPS, open Microsoft’s official .NET download page. Under the latest maintenance release of .NET 10, find the ASP.NET Core Runtime section and download the Windows Hosting Bundle installer. A maintenance release provides fixes within the same major version.
With IIS installed, run the Hosting Bundle installer as an administrator and keep the default components. The package installs the .NET and ASP.NET Core runtimes your application needs, along with the ASP.NET Core Module for IIS integration. If you installed the Hosting Bundle before IIS, reopen the installer now and select Repair to complete the IIS module installation.
Restart the VPS after installation; if it hosts existing sites, do this during a maintenance window. Once you reconnect, open a new PowerShell window on the VPS and run this command to list the installed runtimes:
dotnet --list-runtimesYou should see entries for Microsoft.NETCore.App 10.0.x and Microsoft.AspNetCore.App 10.0.x; x represents the installed maintenance release number. These entries confirm that the runtimes needed by the example application are present.
Next, check that the IIS integration module is installed. Open Server Manager – Tools – Internet Information Services (IIS) Manager. Select the server in the connections tree on the left, then open Modules. If AspNetCoreModuleV2 is listed as well as the required runtimes, you are ready to prepare the published files. If the runtimes are present but the module is missing, repair the Hosting Bundle installation, restart the server and check the same list again.
Publish the app, configure its pool and set permissions
Create the project and publish a Release build
Prepare the example application’s deployment files on your developer PC; you do not need to compile it on the VPS. On your Windows PC, download and install the .NET 10 SDK Windows x64 package from Microsoft’s official .NET download page. The SDK, or software development kit, provides the tools to create and compile the project.
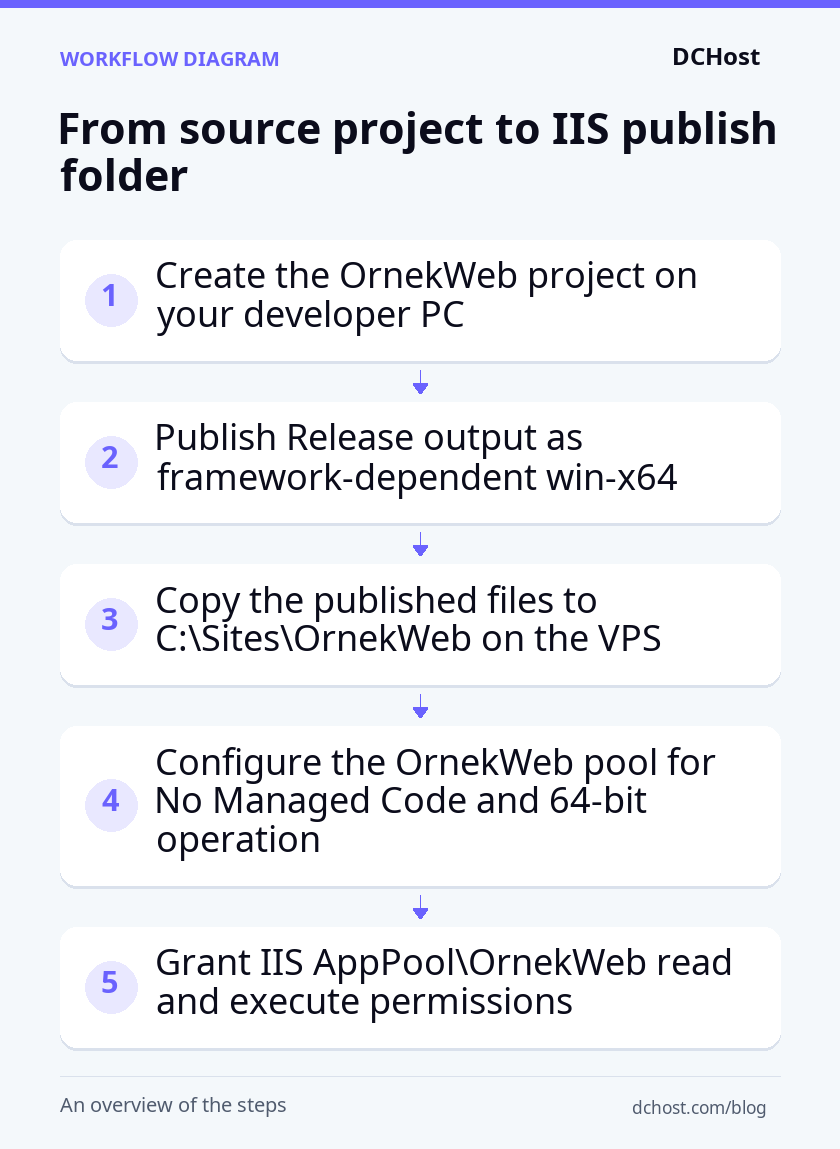
Open a new PowerShell window and run dotnet --list-sdks. Check that the output includes a .NET 10 SDK version matching 10.0.x, where x stands for the remaining version digits. Then run the following commands in the same window to create OrnekWeb and publish its deployment-ready files. For this hypothetical example, the project and publish folders must not already be in use:
New-Item -ItemType Directory -Force C:\src | Out-Null
Set-Location C:\src
dotnet new webapp -n OrnekWeb -f net10.0
Set-Location C:\src\OrnekWeb
dotnet publish -c Release -r win-x64 --self-contained false -p:AspNetCoreHostingModel=InProcess -o C:\publish\OrnekWeb
These commands create and publish a database-free web project using Razor Pages, ASP.NET Core’s page-based framework. Release is the build configuration intended for deployment. Framework-dependent means the application uses the .NET runtime installed on the server; --self-contained false selects this option. win-x64 targets 64-bit Windows, while in-process means the application runs inside the IIS process that handles requests.
After the publish command completes successfully, open C:\publish\OrnekWeb in File Explorer. It should contain OrnekWeb.dll, OrnekWeb.runtimeconfig.json, wwwroot and web.config. These are the published files you will transfer to the VPS.
The automatically generated web.config tells IIS how to start the application and route requests to it through the ASP.NET Core Module. Open the file in a text editor and check for AspNetCoreModuleV2 and hostingModel="inprocess". Keep this generated configuration; do not replace it with one from an older ASP.NET application.
Transfer the published files to the VPS
On your developer PC, open Remote Desktop Connection. Under Show Options – Local Resources – More – Drives, select your local C drive, confirm the selection and reconnect to the VPS. This makes that drive accessible from your remote session so you can copy the published files.
On the VPS, open File Explorer and select the redirected C drive under This PC, rather than the VPS’s own C drive. Find the developer PC’s C:\publish\OrnekWeb folder and copy its contents into a folder you create at C:\Sites\OrnekWeb on the VPS. Copy the published output, not the source project or an extra enclosing folder. When the transfer finishes, web.config should appear directly inside the destination folder.
The destination folder is empty in this example. If it already contains deployment files, use the safe update steps later rather than overwriting them. Unless an environment setting overrides it, the example application defaults to Production, the environment for live use. The developer PC’s launchSettings.json controls local development launch settings; IIS does not use it to configure the deployed application.
Configure the pool and folder permissions
Create a dedicated application pool so your site runs under its own Windows identity, the account used to access files and other resources. On the VPS, open IIS Manager – Application Pools – Add Application Pool. Enter OrnekWeb in the Name field. From .NET CLR version, select No Managed Code. This field controls the older .NET Framework runtime; ASP.NET Core uses its own runtime. Leave Managed pipeline mode, the request-processing mode, set to Integrated. Click OK; the new pool should appear in the list.
Select the new pool and open Advanced Settings. Set Enable 32-Bit Applications to False to match your 64-bit deployment. Under Process Model, select Identity and click the ellipsis button. Choose Built-in account, select ApplicationPoolIdentity and click OK in both dialogs. When you assign the site to this pool in the next section, the application will run under the pool-specific Windows identity IIS AppPool\OrnekWeb.
Next, give that identity permission to read the published files and run the application. These are folder permissions on NTFS, the Windows file system. On the VPS, open PowerShell as an administrator and run:
icacls "C:\Sites\OrnekWeb" /grant "IIS AppPool\OrnekWeb:(OI)(CI)RX"RX grants read and execute permissions; (OI)(CI) passes those permissions to child files and folders. After the command completes without errors, right-click the deployment folder in File Explorer. Under Properties – Security, select the pool identity; you should see Read & execute allowed.
Do not grant the application identity write or full control permissions on the deployment root folder: this application does not need to change its own deployment files. The command adds permissions without removing existing ones, so also check the same screen for write access the identity might receive through other groups. Do not remove administrator or system permissions as part of this check. If diagnostics are needed later, you will grant write permission only to the logs subfolder; the example application does not need that permission for normal operation.
Create the IIS site, connect DNS and verify HTTPS
Create the site and check a local request
Your publish folder is ready. Next, tell IIS which domain name and application pool to use for the site. On the VPS, open IIS Manager, right-click Sites and choose Add Website. Enter OrnekWeb in Site name. Beside Application pool, click Select and choose the existing OrnekWeb pool. In Physical path, the location of your published files, enter C:\Sites\OrnekWeb.
In the Binding section, which determines which requests reach this site, set Type to http, IP address to All Unassigned and Port to 80. Enter your own subdomain in Host name; the hypothetical example uses uygulama.example.com. This binding directs HTTP requests for that hostname to the OrnekWeb site. Click OK; the site should appear under Sites and start. No other site should have a binding with the same combination of IP address, hostname and port.
Before changing DNS, check that local IIS serves the correct application. Run the following command in PowerShell on the VPS, replacing the placeholder hostname with your own. It connects directly to IIS on this server and supplies the hostname needed to select your site:
curl.exe -i -H "Host: uygulama.example.com" http://127.0.0.1/The expected response is 200 OK followed by the HTML content of the OrnekWeb page. If you see the IIS welcome page instead, compare the hostname in the site’s Bindings list with the name in your command. Correct any mismatch and repeat the request before changing application files. If the response redirects to HTTPS, the Location header shows its destination; complete the HTTPS setup below before checking that address.
Configure DNS and allow incoming connections
Once the local check succeeds, point your domain name to the VPS. In your domain’s DNS panel, add an A record, which maps a hostname to an IPv4 address. If you manage the DNS zone for example.com, the name field is usually uygulama; enter the VPS’s public IPv4 address as the value, then save the record. If you are changing an existing record, save its previous value first so you can restore it if needed. Also check for an AAAA record, which specifies an IPv6 address. If you have not configured IPv6 hosting, do not leave a record for this hostname pointing to the wrong server.
DNS directs visitors to the server, but the firewall must also allow their connections. On the VPS, open Windows Defender Firewall with Advanced Security, select Inbound Rules and click New Rule. Choose Port and click Next. Select TCP and Specific local ports, then enter 80,443 for HTTP and HTTPS. Click Next, choose Allow the connection and continue to the profile screen. Select the server’s active network profile, then name the rule OrnekWeb HTTP HTTPS and click Finish. The rule should appear enabled in the inbound rules list. If your provider’s panel has a separate network firewall, allow the same inbound TCP ports there too; do not disable Windows Firewall.
Now check access from outside the VPS. Open PowerShell on your developer PC, replace the placeholder hostname and check DNS with Resolve-DnsName uygulama.example.com, then test port 80 with Test-NetConnection uygulama.example.com -Port 80. The first command should show the VPS’s public IP address; the second should report TcpTestSucceeded: True. If the IP address is wrong, check the saved DNS record and whether an older response remains cached. If the IP is correct but the connection fails, check the firewall rules and confirm that the IIS site is running. After correcting the issue, repeat the failed command before proceeding to certificate setup.
Obtain a certificate and verify the HTTPS binding
HTTPS encrypts the connection between your browser and the server. To enable it, you will obtain a trusted certificate for your subdomain and assign it to an IIS HTTPS binding. This walkthrough uses a certificate provider that accepts a certificate signing request (CSR) and supports DNS validation to confirm that you control the domain.
On the VPS, select the server node in IIS Manager and open Server Certificates – Create Certificate Request. Enter your actual subdomain in Common name and the requested organization and location details in the remaining fields. Select Microsoft RSA SChannel Cryptographic Provider as the provider and 2048 as the key length. Create the destination folder in File Explorer if it does not exist, then save the request to C:\DeployBackups\OrnekWeb.req. You should now have a CSR file to submit to your certificate provider; the corresponding private key stays on the VPS.
Open the generated file in Notepad and paste its entire contents into the CSR field on your certificate provider’s order screen. Check that the order includes your actual subdomain among the names the certificate will cover. Choose DNS validation, then add the record type, name and value supplied by the provider to your DNS panel. Follow your DNS panel’s naming format so it does not append your domain twice. Once the provider confirms domain validation and certificate issuance are complete, download the certificate file supplied for IIS.
Back on the VPS, open Server Certificates – Complete Certificate Request and select the downloaded file. Set the friendly name to OrnekWeb TLS and the certificate store to Personal. Install any intermediate certificates supplied by the provider according to its instructions; these link your certificate to a root certificate trusted by browsers. Complete the request on this same VPS so IIS can associate the issued certificate with the private key created earlier. The certificate should then appear in the Server Certificates list.
If you already have a PFX certificate package containing the certificate and its private key, you can use it instead of creating and completing a CSR. In Server Certificates, choose Import, supply the PFX file and its password, and import it into the Personal store. Keep the PFX out of the publish folder: anyone who obtains it and its password could access the private key. After installation, remove the transfer copy and retain a secure backup.
Once the certificate appears in the list, open Sites – OrnekWeb – Bindings – Add. Set Type to https, Port to 443 and Host name to your actual subdomain. Leave IP address set to All Unassigned for this example. Select Require Server Name Indication; SNI lets IIS select the certificate by hostname when sites share an IP address. Choose the certificate you just installed from the SSL certificate list and click OK. The bindings list should now show an HTTPS entry with your hostname.
On your developer PC, open your domain over HTTPS in a browser. The OrnekWeb page should load without a certificate warning. Open the browser’s certificate details and check that the certificate covers your subdomain, is within its validity dates and has a trusted certificate chain. If you see a warning, compare those details with the certificate selected in the IIS binding, then correct any domain mismatch or missing intermediate certificates and reopen the same address. If the connection fails before a page or certificate appears, check that the HTTPS binding exists and inbound TCP port 443 is allowed. Bypassing a certificate warning does not count as a successful HTTPS check.
Diagnose startup errors and update safely
Narrow down the problem using the error code
If the application returns an error page, note its status code, then open Event Viewer – Windows Logs – Application on the VPS. Request the page again and look for IIS AspNetCore Module V2 entries matching that time. The sc-status and sc-substatus fields in the IIS logs show the main HTTP status code and its more specific substatus. To locate these logs, select the OrnekWeb site in IIS Manager and check the Directory field on the Logging screen. Use the matching row below to choose your next check.
| Symptom | Diagnostic check and targeted fix |
|---|---|
| 500.19 | Read the error code and configuration line in the error details returned by a request made from the VPS. If the XML configuration syntax is invalid, save a copy of the file outside the publish folder and correct only the faulty line. If the error identifies an unrecognized ASP.NET Core Module, repair the Hosting Bundle installation. For an access-denied error, check file permissions. |
| 500.30 | The application failed to start. Examine the exception-the error reported by the application-in the Application log. Correct the missing setting or startup code error identified in that entry. Do not install different runtimes based on this status code alone. |
| 500.31 | On the VPS, compare the output of dotnet --list-runtimes with the framework requirements in OrnekWeb.runtimeconfig.json. This example requires x64 Microsoft.NETCore.App and Microsoft.AspNetCore.App 10.0.x. If they are missing, install the appropriate Hosting Bundle. |
| 503 | Check the OrnekWeb pool’s status under IIS Manager – Application Pools. If it is stopped, examine WAS (Windows Process Activation Service, which manages IIS worker processes) events under Event Viewer – Windows Logs – System. Resolve the crash or identity issue identified there, then select the pool and click Start. Do not disable Rapid-Fail Protection, which stops the pool after repeated crashes. |
| 401.3 or 403.14 | For 401.3, examine permissions in PowerShell with icacls C:\Sites\OrnekWeb; grant only read/execute access to the identity that needs to read the files. For 403.14, check that the site’s physical path points to the publish folder and that the generated web.config is directly inside it. Enabling directory browsing will not start the application and may expose file names. |
After each fix, reopen the same address and check the logs for entries matching the new request. The expected result is the application page loading without the corresponding error recurring. Change one setting at a time so you can identify which change resolves the problem.
Enable startup logging temporarily
If the event log does not reveal the cause, temporarily capture the application’s startup output in a file. First, save a copy of web.config outside the publish folder so you can restore it if the edit causes problems. To create the log folder and grant write access only to that folder, run these commands in an administrator PowerShell window on the VPS:
New-Item -ItemType Directory -Force C:\Sites\OrnekWeb\logs | Out-Null
icacls "C:\Sites\OrnekWeb\logs" /grant "IIS AppPool\OrnekWeb:(OI)(CI)M"
The commands should complete without errors. The final M grants Modify permission, allowing the pool identity to write diagnostic files in the logs folder without granting write access to the deployment root.
Open the publish folder’s web.config file in a text editor running as administrator. In the existing aspNetCore element, set stdoutLogEnabled="true" and stdoutLogFile=".\logs\stdout"; preserve the other attributes. Save the file, request the page again, then open the newly created file in the logs folder. Look for the startup exception and any details identifying a missing setting or dependency.
stdout means standard output. This setting redirects the application’s standard output and error streams to files, which can reveal startup failures not fully described in Event Viewer. These files have no automatic size limit, so keep this logging enabled only while diagnosing the problem.
When diagnosis is complete, set the stdoutLogEnabled value to false and save the file. If the application does not otherwise write to this folder, open the logs folder’s Properties – Security – Advanced screen and remove the explicit Modify permission you added for the OrnekWeb pool identity. Retain the read/execute permission inherited from the parent folder. Request the page again and confirm that no new startup log is created and the existing log is no longer growing.
Do not share these files publicly, because logs may contain passwords or connection details. Follow the principles of secret management on a VPS to store settings securely. Keep the environment set to Production; switching to Development could expose error details to visitors.
Update with a rollback copy ready
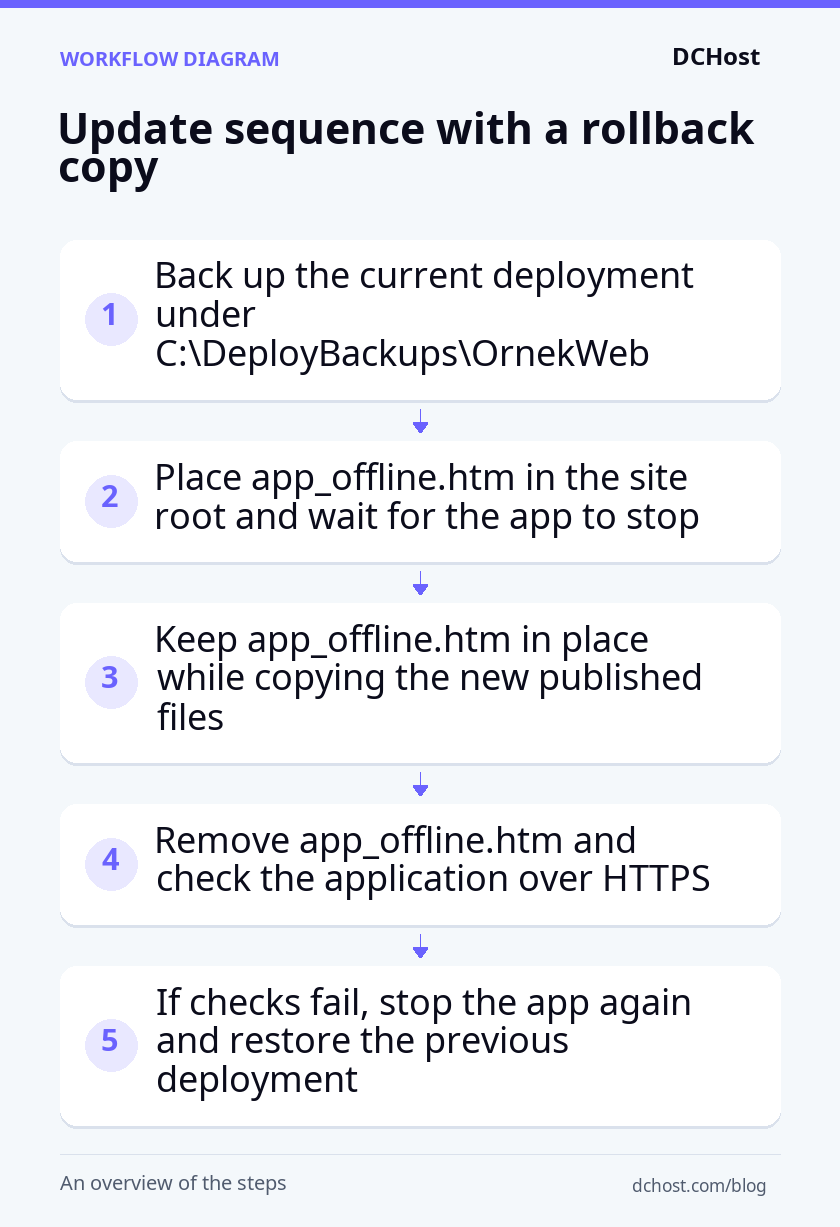
- Back up the deployment: In File Explorer on the VPS, copy the contents of the current publish folder to
C:\DeployBackups\OrnekWeb\surum-001. Use a separate backup folder for each release so you do not overwrite an earlier rollback copy. Open the backup folder and confirm that the published files, including web.config, are directly inside it. A file copy is sufficient for this example application because it does not write persistent data; database migrations are outside the scope of this procedure. - Stop the application: Write a short maintenance message in
C:\Sites\OrnekWeb\app_offline.htm. If you use Notepad, select All Files as the file type when saving; the file name must not have .txt appended. The ASP.NET Core Module detects this file and shuts down the application. Refresh the page in your browser and confirm that the maintenance message appears before replacing any files. If files remain locked, select only the OrnekWeb pool under IIS Manager – Application Pools and click Stop. While the pool is stopped, visitors may see a service-unavailable response instead of the maintenance message. - Replace the files: Keep app_offline.htm in place while removing the old published files and copying the complete new Release output from your developer PC into the same publish folder. Compare server-specific settings against the backup and preserve the required values. In File Explorer, open a copied file’s Properties – Security – Advanced screen and confirm that it inherits the pool identity’s read/execute permissions from the publish folder. The new web.config and application files should be directly inside the publish folder, not inside an extra nested folder.
- Verify or roll back: If you stopped the pool, click Start on the same screen, then remove app_offline.htm. From your computer outside the VPS, open the home page and Privacy page over HTTPS; both should load without application errors or certificate warnings. If these checks fail, put the maintenance file back and confirm that the application has stopped, using Stop on the OrnekWeb pool if files remain locked. Keep the maintenance file in place while removing the new published files and copying back the contents of surum-001. If you stopped the pool during rollback, start it again. Remove the maintenance file and repeat the same page checks.
This method interrupts service while you replace and check the deployment. If you need to reduce downtime, you can design a switch between separate deployment folders, but changing the file path alone is not enough. Running processes and application state must also be managed to support that transition.
Frequently Asked Questions
Do I need to install the .NET SDK on the Windows VPS?
No, unless you plan to build applications on the server. The SDK is the toolkit for developing and building your application. In this example, you install it only on your developer PC and transfer the published output to the VPS rather than source code.
The server needs the appropriate .NET runtime and the module that connects the application to IIS. The Hosting Bundle supplies both. Installing the SDK does not replace the Hosting Bundle.
Can different .NET versions run on the same server?
Yes, runtimes for different major versions can coexist. As a hypothetical example, applications targeting .NET 8 and .NET 10 can run on the same IIS server if their required runtimes are installed. Give each application a separate application pool. The walkthrough’s in-process model, where the application runs inside the IIS worker process, does not support multiple applications sharing a pool.
Before removing a runtime, check the requirements in your applications’ runtimeconfig.json files. Installing a new major version does not automatically upgrade an application targeting an older version; it may still need the older runtime.
Will users be signed out when the server restarts?
Not necessarily. To read existing authentication cookies after a restart, your application must still have access to the keys used by Data Protection, the ASP.NET Core system that protects data such as authentication cookies. If those keys are held only in memory, users may need to sign in again after a restart.
When you add sign-in functionality, check where the keys are stored. If you choose a persistent file-based store, keep it outside the publish folder so deployment updates do not delete the keys. Restrict access to the application identity and necessary administrator accounts. Use a method such as DPAPI, Windows’ data protection mechanism, to encrypt the keys on disk.
Include the keys in your backup plan and ensure that you can decrypt the restored keys in the recovery environment. DPAPI protection can tie decryption to a Windows account or machine, so copying the key files alone may not be enough when moving to another server.
During a maintenance window, sign in to the application. In IIS Manager, open Application Pools, select the application’s pool and click Recycle. Reload the application in the same browser and check that you remain signed in. Session, meaning server-side session data, can still be lost on restart if it is stored in memory, even when the authentication cookie remains valid.
Can I run continuous background jobs in an IIS application?
You can, but you cannot rely on an IIS application running continuously. A pool restart, an idle shutdown or a deployment update can interrupt work started with BackgroundService. The AlwaysRunning setting enables the pool to start automatically, but it does not eliminate these interruptions.
For continuous queue processing or long-running tasks, a separate .NET Worker Service running as a Windows service is more suitable. This keeps the background work separate from the IIS application’s lifecycle. For jobs that run at scheduled times, you can use Windows Task Scheduler. With either approach, save job progress to persistent storage and design retries so they do not accidentally perform the same operation twice.
Final checklist before going live
A working home page confirms that the application runs, but there are a few more checks before you go live. Use this checklist to confirm that the application runs under the correct Windows identity, is accessible over HTTPS from outside the VPS and has a recovery path if an update fails.
- Required runtimes are installed: Run
dotnet --list-runtimesin PowerShell on the VPS. For this example, theMicrosoft.NETCore.AppandMicrosoft.AspNetCore.Appentries should show versions 10.0.x, where x represents the installed maintenance release. Select the server in IIS Manager and open Modules; the list should also includeAspNetCoreModuleV2. - The pool uses the correct identity: Open IIS Manager – Application Pools, select OrnekWeb and open Advanced Settings. Identity should be
ApplicationPoolIdentity, .NET CLR Version should beNo Managed Codeand Enable 32-Bit Applications should beFalse. Then open Sites – OrnekWeb – Basic Settings and confirm that the site is assigned to the OrnekWeb pool. - Folder permissions are limited: Examine the output of
icacls C:\Sites\OrnekWebin PowerShell on the VPS. TheIIS AppPool\OrnekWebidentity should have read and execute permissions at the root of the publish folder, without gaining write access through other groups. If you added write permission to the logs folder for temporary diagnostics, confirm that you removed it when it was no longer needed. - HTTPS works externally: Open your domain over HTTPS from your computer outside the VPS. The home page and Privacy page should load without certificate warnings. Open the browser’s certificate details and check that the certificate covers your hostname and is within its validity dates. This checks external access as well as the application’s response.
- Temporary diagnostics are disabled: Open the deployed
web.configfile and check that it containsstdoutLogEnabled="false". Confirm that the application runs in theProductionenvironment, with no Development environment setting left over from troubleshooting. Disable only the temporary startup diagnostics; keep normal IIS access logs and application error logging enabled. - A rollback copy is ready: Before an update, open the previous release folder under
C:\DeployBackups\OrnekWebin File Explorer and confirm that it contains the published files and server-specific settings. For a first deployment, save a copy of the working release once your checks pass; it will be your rollback copy for the next update. Noapp_offline.htmfile should remain in the live publish folder. Record the rollback steps and the backup folder path so you can find them quickly.
Make monitoring and certificate renewal your next steps. Set up a check for external HTTPS access and the expected page content, then send a test notification to confirm that alerts reach you. Assign responsibility for certificate renewal and schedule it before the certificate expires. If you use automatic renewal, confirm that it also updates the certificate selected in the IIS binding. These checks help you catch access problems and keep HTTPS working after deployment.